A Closer Look at Preparing Active Directory for Exchange 2007 (Part 5)

Introduction


This is the fifth and final part of an article series covering the preparation of Active Directory to receive the first Exchange 2007 server. So far in this article series we’ve covered the preparation of legacy permissions, the schema and Active Directory. This just leaves the final part which is the preparation of the Active Directory domains that will contain either Exchange 2007 servers or Exchange 2007 users.


Preparing The Domains


So here we are at the very last part of the process, namely the preparation of the Active Directory domains to receive Exchange 2007. If you have deployed legacy versions of Exchange you may remember the DomainPrep process that existed with Exchange 2000 and Exchange 2003. Well, preparing the domains for Exchange 2007 is similar in that the process must be performed in two locations:


In each domain that you will install an Exchange 2007 server into
In each domain that will contain mail-enabled users


To prepare a domain you use the setup /PrepareDomain command, or setup /pd for short. This prepares the domain from where you are running the command, although as I said earlier in this article the setup /p process prepares the domain in which the setup /p process was run so you don’t need to repeat this process in that domain. You can also choose to prepare a specific domain by adding the Fully Qualified Domain Name (FQDN) of that domain to the command, such as:


setup /pd:sales.neilhobson.com


To successfully complete this process you must be running the command from an account that has Domain Admin rights. You may be thinking that this could be a laborious process if you have many domains across your Active Directory infrastructure. Fortunately, you can prepare all domains in one go via the setup /PrepareAllDomains command, or setup /pad for short. Obviously, to prepare all domains the account you use must be a member of the Enterprise Admins group.


Running the setup /pd process for just the sales.neilhobson.com domain can be seen in Figure 28.


Figure 28: Running The Setup /pd Process

Note the warning message which, in this case, has occurred because I have not configured a domain Recipient Update Service in the root domain.

What exactly does the domain preparation process do and how can you check for success? Essentially the process assigns various permissions and also creates additional objects that you can check visually. For example, in the domain that has been prepared you will see a new group called Exchange Install Domain Servers. To see this group, bring up the Active Directory Users and Computers snap-in and make sure that advanced features are being displayed by selecting the Advanced Features option from the View menu. Select the Microsoft Exchange System Objects container from the left-hand pane and in the right-hand pane you should be able to locate the Exchange Install Domain Servers group as you can see from Figure 29.

Figure 29: Exchange Install Domain Servers Group

Back in your root domain, locate the Exchange Servers group found in the Microsoft Exchange Security Groups Organizational Unit and bring up its properties. On the Members tab, confirm that the Exchange Install Domain Servers group from the child domain that has just been prepared is a member of this group, as you can see from Figure 30.

Figure 30: Membership of The Exchange Servers Group


You will notice in Figure 30 that the root domain’s Exchange Install Domain Servers group is already a member of the Exchange Servers group. This is because the setup /p process, which had to be run in the root domain, automatically prepared this domain. As you can see, the presence of the Exchange Install Domain Servers group is a good indication that the domain preparation process has run and has completed successfully.

However, there are other things that you can check to be sure. The domain preparation process also updates one of the properties of the Microsoft Exchange System Objects container as you are about to see. By running ADSIEdit and connecting to a domain controller in the child domain, it’s possible to bring up the properties of the Microsoft Exchange System Objects container as you can see from Figure 31. I won’t detail all the steps for doing this as use of ADSIEdit is covered in the previous parts of this article. All I will say is that you need to connect to the domain naming context, locate the Microsoft Exchange System Objects container, right-click it and choose Properties from the context menu. In the resulting window, scroll down until you find the objectVersion attribute.


Figure 31: objectVersion Attribute

In Figure 31 you can see a value of 6936 which is the value assigned after Exchange 2003 RTM has been installed. Once you have performed the Exchange 2007 domain preparation process you should see this number change. For Exchange 2007 RTM it’s 10628 whilst for Exchange 2007 SP1 it’s 11221.

Finally, there is one last check that you can make which Microsoft does detail in its documentation. After the domain preparation process for Exchange 2007, the Exchange Servers Universal Security Group is granted permission on the Manage Auditing and Security Log found in the domain controller’s security policy.
To locate this, perform the following steps:

Choose Start and then Administrative Tools

In the Administrative Tools folder, choose Domain Controller Security Policy.

Under Security Settings, expand Local Policies and then select User Rights Assignment. In the right-hand pane you should now see the policies and the policy settings listed as shown in Figure 32.

Figure 32: User Rights Assignment

Scroll down the list of policies until you reach the policy called Manage auditing and security log. Double-click this policy which brings up the properties window and note that the Exchange Servers Universal Security Group now has permissions set as shown in Figure 33.

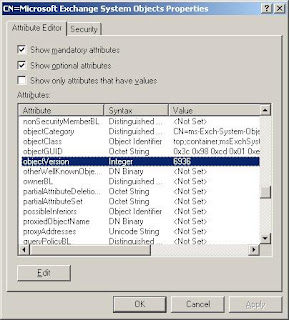
Figure 33: Exchange Servers USG Permissions

Summary

There you have it, all four Active Directory preparation steps covered; how to perform the steps and what to look for. I must admit that I have taken the time to write these four steps over five parts of this article which does seem a lot. However, I’ve felt that it has been useful to explain the preparation processes in some depth with plenty of screen shots since these processes are vital to a successful deployment of Exchange 2007. If you’ve still to deploy Exchange 2007, hopefully this should help you understand what is going on during these processes. If you’ve already deployed Exchange 2007 but not yet taken any of the Microsoft exams, note that the skills being measured include Active Directory preparation.

A Closer Look at Preparing Active Directory for Exchange 2007 (Part 4)

Introduction

This is the fourth part of an article series covering the preparation of Active Directory to receive Exchange 2007. So far in parts one to three we’ve looked at the preparation of the legacy permissions, followed by the preparation of the schema. Throughout these three parts we’ve also looked at how to confirm each step has completed successfully, using additional tools such as log files, LDP.EXE and ADSIEdit. Some administrators consider it important to confirm that the various processes have completed successfully rather than just relying on ‘success’ messages given at the end of each step.

We are now going to continue or look at the overall preparation process by examining what is required for the step known as Active Directory preparation.

Preparing Active Directory

The third of the four steps covered in this article is the step where Active Directory is prepared by the creation of various objects and the assignment of further permissions. As we’ve already seen in the other parts of this article, the running of one particular command will execute the steps of the previous command if that previous command hasn’t been run individually, and the particular command we’re about to discuss is no different. In other words, this command will automatically prepare the legacy permissions and the schema if this hasn’t already been done.

The command to use to prepare Active Directory is setup /PrepareAD or setup /p for short. If you are coexisting with legacy versions of Exchange then the organization container will already exist within Active Directory. If you are installing Exchange for the first time, then you will need to add the /OrganizationName or /on switch and specify the chosen Exchange organization name. For example:

setup /p /on:Exchange

This command will ensure that Active Directory is prepared with an Exchange organization name of Exchange. You can see from Figure 23 what the process of preparing Active Directory looks like.
Figure 23: Running Setup /p

Since this command is not making any schema changes you do not need to be a member of Schema Admins to run it in the same way as you did with setup /ps. However, you still need to be a member of Enterprise Admins so factor this in when considering who will be running this command. Also, like the setup /ps process, you still need to execute this command on a server that is located in the same Active Directory site and domain as that of the schema master. Although you are not making schema changes, the setup /p process writes the changes specifically to the schema master before propagation around the remainder of the domain controllers.

You have seen throughout the other parts of this article that you can use tools such as LDP and ADSIEdit to check that processes have completed successfully. With setup /p, several very visible changes are made that you can see from applications such as Active Directory Users and Computers and Exchange System Manager. For example, in the root domain of your Active Directory infrastructure you will see a new Organizational Unit (OU) created called Microsoft Exchange Security Groups and within that OU you will see the following six security groups:

Exchange Organization Administrators
Exchange Public Folder Administrators
Exchange Recipient Administrators
Exchange Servers
Exchange View-Only Administrators
ExchangeLegacyInterop

You can see this OU and the groups within it in Figure 24. Remember, this OU is only created in the root domain of your Active Directory infrastructure. In my case, this is the neilhobson.com domain so this means that this OU won’t be seen in the sales.neilhobson.com domain.

Figure 24: Microsoft Exchange Security Groups OU

Also, after having performed the setup /p process, it may become very apparent to administrators of Exchange 2000 or Exchange 2003 that something has changed and the upcoming deployment of Exchange 2007 is just around the corner. This is because the new Exchange 2007 administrative and routing groups will now be present in the Exchange System Manager as you can see from Figure 25.

Figure 25: Exchange 2007 Administrative and Routing Groups

The Exchange Administrative Group (FYDIBOHF23SPDLT) and Exchange Routing Group (DWBGZMFD01QNBJR) objects are created to house all Exchange 2007 servers so that legacy versions of Exchange will understand how to contact the new Exchange 2007 servers. You will not see these administrative and routing group objects in the Exchange 2007 Management Console since the concept of administrative and routing groups are deprecated features as far as Exchange 2007 is concerned. Obviously there will be no server objects under the Exchange 2007 administrative group at this stage since we’ve not actually installed an Exchange 2007 server yet, but nevertheless the administrative and routing group objects exist at this time. This is confirmed in Figure 25 where you will notice there is no Servers container directly under the Exchange Administrative Group (FYDIBOHF23SPDLT) object.

Finally, one other easy check you can make at this time is to examine the contents of the Exchange organization container using ADSIEdit. Consider Figure 26 below which is the container contents prior to the running of setup /p. Then compare this to Figure 27 which is the container after the running of setup /p. Note that there are more items in Figure 27, such as the Client Access, ELC and UM containers. These are created as a result of running setup /p.


Figure 26: Organization Container Prior to Setup /p


Figure 27: Organization Container After Setup /p

The setup /p process also configures many additional permissions, far too many for me to list here. Checking the above configuration elements should be enough for you to be sure that the process has completed successfully. As ever, don’t forget that you can check the setup logs for much more additional information.

In the last part of the process which I’ll cover in the final part of this article series we are going to be looking at the preparation of the Active Directory domains. You should note that the setup /p process actually prepares the domain from which it is run, so that’s one less domain to worry about later on.

One word of caution about the setup /p process is the fact that Microsoft states this process must contact all domains within your Active Directory forest, even those that have not had legacy Exchange servers installed into them; you will need to plan for this if you have a large or complex Active Directory infrastructure.

Summary

In this penultimate part of the article series, we have looked at the step of preparing Active Directory and what to check for to make sure that this command has completed correctly. Several key changes are made during this step, such as the creation of the Microsoft Exchange Security Groups OU in the root domain, as well the creation of legacy administrative and routing groups. In the final part of this article we’ll be looking at the last step, namely the preparation of Active Directory domains.

A Closer Look at Preparing Active Directory for Exchange 2007 (Part 3)

Introduction

Over the course of the first two parts of this article we have looked at the first step required when preparing Active Directory to receive Exchange 2007, namely the preparation of legacy Exchange permissions. For those of you that are not coexisting with either Exchange 2000 or Exchange 2003 this step will not be required. However, throughout the first two parts of this article there is extremely useful information that may prove of worth to you in the future, such as using tools such as LDP to determine if the specified permissions have been set correctly. If you have skipped the first two parts of this article because you are not coexisting with either Exchange 2000 or Exchange 2003, I still urge you to read these parts anyway.

Now it is time to move on with the rest of the Active Directory preparation steps, starting with the preparation of the Active Directory schema.

Preparing The Schema

Like legacy versions of Exchange such as Exchange 2000 and Exchange 2003, Exchange 2007 requires updates to the Active Directory schema in order to operate. Therefore, you will need to ensure that the account you use for the following process is a member of the Schema Admins group. In addition, the account also needs to be a member of the Enterprise Admins group to successfully complete the schema update process. You will likely need to plan ahead for making this change since, in secure environments, it is likely that membership of these groups is not given out at a moment’s notice. Finally, note that you must have access to the Active Directory domain controller running the schema master role to run this process since you are making changes to the schema. Specifically, run the schema preparation process from a server that is located in the same Active Directory site and domain as that of the schema master. If you don’t, the organization checks portion of the schema update process will fail with this descriptive error:

Setup needs to contact the Active Directory schema master but this computer is not in the same Active Directory domain as the schema master (DC=domain,DC=com).

Setup encountered a problem while validating the state of Active Directory: Exchange organization-level objects have not been created, and setup cannot create them because the local computer is not in the same domain and site as the schema master. Run setup with the /prepareAD parameter on a computer in the domain {domain} and site {site name}, and wait for replication to complete.”

In parts one and two of this article we have already prepared the legacy permissions via the setup /pl command since we are coexisting with Exchange 2003. However, if for some reason you have not issued this command and you are going to coexist with legacy versions of Exchange, note that it will be performed as part of the schema update process that I am about to cover.

In this article we are coexisting with Exchange 2003 so it is worth pointing out that the Exchange 2007 schema update also includes the schema updates applicable to both Exchange 2000 and Exchange 2003.

To prepare the schema with the Exchange updates, you use the following command:

setup /PrepareSchema

As with the command used for the preparation of the legacy permissions there is a shortened version of the schema update command. It is:

setup /ps

In my example environment I am going to run setup /ps on the root domain controller called AD-ROOT. You can see the result of running this command in Figure 15 where the updates have been successful.

Figure 15: Successful Schema Update

Updating the schema can take a few minutes. If you want to check that the process is running, then during the Extending Active Directory schema portion of the process navigate to the TEMP folder of the user account that you are using to perform the schema update process. By default, the user’s TEMP location will be the %USERPROFILE%\Local Settings\Temp folder. You can see what this looked like during my schema update in Figure 16.

Figure 16: Contents of The TEMP Folder

As you can see from Figure 16 there are three temporary files in this location at the time I captured the screen shot. The file of interest is highlighted, namely ldif.log. This file, at the time of the screen capture, contained the contents of one of the specific LDIF files from the Exchange 2007 source files and was the LDIF file being imported at the time. If you monitor the contents of the TEMP folder during the schema update process, you will see the ldif.log file alternate between 0KB and around 3KB as the different LDIF files are processed. Figure 17 shows you the contents of the ldif.log file at a specific point in time during the schema update process.

Figure 17: Contents of LDIF.LOG

Active Directory Replication

It is recommended that you check Active Directory has replicated the changes throughout your environment once you have made the changes in any of the steps in this article series. To confirm whether the schema update has been applied to your domain controllers, you can check the value of rangeUpper on the ms-Exch-Schema-Version-Pt attribute using ADSIEdit when connected to a specific domain controller. This attribute is used to track the version of the schema that has been installed and since the rangeUpper value for Exchange 2007 SP1 is 11116 that is the value we need to look out for. If you are reading this article and Microsoft has released a new service pack for Exchange 2007, this value will be different so be sure to check out what the new value should be. Here’s how to confirm that a domain controller has this value set. This process assumes you’ve installed the Windows Support Tools since that’s where you obtain ADSIEdit.

Run ADSIEdit.msc

In the left-hand pane of the main ADSIEdit window, expand the Schema object and then select the next Schema object that appears below it.

In the right-hand pane, locate the CN=ms-Exch-Schema-Version-Pt attribute, right-click it and select Properties from the context menu.

In the resulting properties window, scroll down the list of attributes until you reach the rangeUpper attribute. Check that the Value column shows 11116 as you can see in Figure 18.

Figure 18: Value of rangeUpper

Another tool supplied with the Windows Support Tools that is useful for checking Active Directory replication is the Active Directory Replication Monitor, replmon.exe. Here is what to do to use this tool:

Run Replmon.exe and you will be presented with the main Replmon window as shown in Figure 19.
Figure 19: Replmon Main Window

In the left-hand pane, right-click Monitored Servers and choose Add Monitored Server… from the context menu. The Add Monitored Server wizard opening window appears.

In this opening window, select the relevant option to either add the domain controller by name or search a specific domain. Since I only have a few domain controllers in my lab, I’ll choose to add the server by name.

In the Add Server to Monitor window, the option available is Enter the name of the server to monitor explicitly and therefore in this field I enter the Fully Qualified Domain Name (FQDN) of a domain controller to monitor as you can see in Figure 20.

Figure 20: Adding a Specific Server

After you click Finish, you will be back at the main Replmon window but this time a connection has been made to the chosen domain controller. Repeat this process for other domain controllers as required and you should see a screen similar to the one shown in Figure 21.

Figure 21: Replmon With Monitored Servers

It is now possible to check the replication of the various containers by expanding them and checking the information presented in the right-hand pane. For example, look at Figure 22 where you can see that replication was failing before the successful update.

Figure 22: Replication Failure and Success

You may remember that in part one of this article we briefly covered the fact that Exchange creates setup log files during the various Active Directory preparation tasks. If you have looked again in the C:\ExchangeSetupLogs folder during the steps listed in part two of this article, you may have noticed that the schema update process also creates the PowerShell script called Install-ExchangeOrganization-{DATE}-{TIME}.ps1. Examining the contents of these programmatically generated PowerShell scripts can help your understanding of the Exchange setup process, so it’s worth checking them out.

Summary

Here in part three of this article we have covered a very important part of the Active Directory preparation process, namely the preparation of the schema. It can be said that all parts of the preparation process are vital to the successful running of Exchange, but there is always that something extra about updating your schema. It is important to verify that the schema has updated correctly so use the steps in this article to do so.

A Closer Look at Preparing Active Directory for Exchange 2007 (Part 2)

Introduction

In part one of this 5-part article, we started our look at the four steps required to prepare Active Directory to receive Exchange 2007. The first step is the preparation of the legacy Exchange permissions in situations where you are coexisting with legacy versions of Exchange, such as Exchange 2000 or Exchange 2003. In part one we got as far as running setup /pl only to be presented with a few issues that need resolving before the process can complete. These issues were presented to us within the command window but as you will see there are other ways to see what has occurred when running these preparation commands.

Setup Log Files

As with all the preparation processes that we will cover in this article, log files are created that you can examine after the process has completed should there be any issues. The file to examine is the ExchangeSetup.log file that is created in the C:\ExchangeSetupLogs folder as you can see from Figure 3.
Figure 3: Exchange Setup Log

If you open the ExchangeSetup.log file in notepad you will see the same errors and warnings in the text file that you saw in the command window that was shown in part one of this article. These errors are highlighted in Figure 4:


Figure 4: Inside The Exchange Setup Log

You should note that some errors ‘hide’ other errors that may be present within your legacy Exchange organization. For example, once I have added the account that I am using to the Enterprise Admins group and also switched the legacy Exchange organization to native mode, re-running the setup /pl command produces a new error that you can see in Figure 5. Here I am informed that one or more Exchange 2003 servers in the legacy environment does not have Exchange 2003 Service Pack 2 installed on it. The moral of the story here is to make sure that you have fully documented your legacy Exchange environment and fixed any issues that may prevent the preparation of the legacy Exchange permissions prior to running this command. If you have not, be prepared to run this command many times to discover any issues that you may have missed.


Figure 5: Exchange 2003 SP2 Missing Error

Eventually you should be able to run the setup /pl command through to successful completion as shown in Figure 6, although note in this case the warning regarding .NET Framework 2.0 SP1 is still there which proves that in this case the warning message does not actually prevent you from proceeding.

Figure 6: Successful Legacy Permissions Process

Examining the Permissions Set

So how might you go about proving that the legacy permissions preparation has completed successfully? Well, the first thing to remember is that the log files are your friends here as we discussed in part one of this article. Firstly, check through the ExchangeSetup.log file and check that the processes complete without errors.

Next, note that within its documentation Microsoft has provided detailed information on the Access Control Entries (ACEs) that are added by this process. The question remains on how we can determine if these ACEs have been added. Let’s look a bit more closely at the ExchangeSetup.log file produced during the setting of the legacy Exchange permissions. An extract is shown in Figure 7. Note that I have set Notepad with the Word Wrap option so that you can see the whole of each entry in the log file.


Figure 7: ACE Entries in ExchangeSetup.log

What you can see in Figure 7 is the various ACEs that have been applied. Taking the first entry listed, you can see that a WriteProperty ACE has been added to the domain itself (DC=neilhobson,DC=com). Also of interest is the Globally Unique Identifier (GUID) that you can see at the end of the entry as you shall see later in this article. This GUID is 1f298a89-de98-47b8-b5cd-572ad53d267e. If you look further down the log file you can see that a ReadProperty and WriteProperty ACE has been applied to the AdminSDHolder object.

Microsoft has detailed in various whitepapers a method for confirming that these ACEs exist and so for article completeness I will go over that process here to demonstrate in my lab environment what to do. You can use the LDP tool that is supplied as part of the Windows Support Tools to check the ACEs that are added by the legacy permissions preparation process. I will not cover all the ACEs that are added but rather I will focus on the two that I mentioned in the previous paragraph, namely the WriteProperty on the domain object and the WriteProperty/ReadProperty set on the AdminSDHolder object. Let’s start with the ACE added to the domain object:

Run LDP.EXE.

At the main LDP window, click Connection then Connect…

In the Connect window, enter the name of the root domain controller and then click OK. This window is shown in Figure 8.

Figure 8: LDP Connect Window

Back at the main LDP window, click Connection then Bind…

In the Bind window, enter the username, password and domain of a user account that has permissions, such as the root domain Administrator account. This window is shown below in Figure 9.

Figure 9: LDP Bind Window

The right-hand pane should now inform you that you have been authenticated. Click View and then Tree and in the Tree View window, just leave the BaseDN field blank and click OK.

Back at the main LDP window, you should see your root domain listed at the top of the left-hand pane as shown below in Figure 10.

Figure 10: LDP Tree View

Before you go any further, clear the contents of the right-hand pane by clicking Connection and then New. This just makes reading the information in the next step much easier.

Right-click the domain at the top of the left-hand pane and choose Advanced, then Security Descriptor from the context menu as shown in Figure 11.

Figure 11: Security Descriptor Menu Option

In the resulting Security Descriptor window, leave the Dn field as it is and select OK.

The right-hand pane will now fill with lots of information detailing the ACEs. In my lab there were a total of 40 ACEs defined. Your screen should look similar to that shown in Figure 12.

Figure 12: ACEs Displayed

If you scroll through the list of ACEs you should find the entry for the WriteProperty ACE set on the domain object as you can see from Figure 13. Here you can see the fact that this is a WriteProperty ACE (from the text ACTRL_DS_WRITE_PROP) and that the security identifier granted this entry is the Exchange Enterprise Servers group. Also note that the GUID listed earlier is present.

Figure 13: Domain ACE For The Exchange Enterprise Servers Group

Let’s now confirm whether we can see the ACE set on the AdminSDHolder object. Leave LDP open where it was and follow these steps:

Click Connection then New to clear the right-hand pane.

In the left-hand pane, expand the domain object and then double click the System object. Directly under the System object you will see the AdminSDHolder object.

Click Connection then New to clear the right-hand pane again.

Now right-click the AdminSDHolder object and choose Advanced and then Security Descriptor exactly as you did earlier in this article.

At the resulting Security Descriptor window, leave the Dn field as it is and choose OK.

You will again be presented with lots of ACE information in the right-hand pane. You can now scroll through the list of entries and find the one that sets the ReadProperty and WriteProperty for the Exchange Enterprise Servers group as you can see from Figure 14.

Figure 14: AdminSDHolder ACE For The Exchange Enterprise Servers Group
That completes our look at the setting of the legacy Exchange permissions. I know that I have spent a lot of article space on preparing the legacy permissions but hopefully this is warranted in that this section gives you plenty of information on how to confirm how you can check whether ACEs have been applied or not.

As you will see throughout this part and the next part of the article, you really should wait for Active Directory replication to occur before proceeding with the next portion of setup and there are ways to check this. I will detail this process after the next step, preparing the schema, since some readers of this article may have skipped this article and part one of the article series if they are not coexisting with legacy versions of Exchange.

Summary

Here in part two of this article we’ve finished our look at preparing the legacy Exchange permissions, covering how to tell that the process completed correctly. In part three we will look at the steps required to prepare the Active Directory schema and cover how to tell that this step has completed successfully along with how to check Active Directory replication.

Using Exchange Server 2007 Built-in Scripts - Part 2: Generating Transport AntiSpam Agent Reports

Introduction

In our last article we saw some built-in scripts related to Public Folder management. We also saw that all Exchange default scripts are located under the scripts folder within the Exchange Server installation folder.

In this article we are going to go over some scripts that enable administrators to get some reports from anti-spam agents and we are also going to use some extra scripts to improve the admin experience in order to create better reports.

Generating HTML output from the Exchange Management Shell …

First of all, let’s use the PowerShell Scriptacular that is a set of useful scripts that can be used with PowerShell and also with the Exchange Management Console. This set of scripts was developed by Vivek Sharma and Mihai Jalobenau during their work on Exchange Management Shell.

To download this pack we can check the viveksharma.com: techlog where you can download the latest version. The current Scriptacular has the following scripts:

Addfakeservers.ps1
removefakeservers.ps1
balancemailboxes.ps1
generate.ps1
cleanup.ps1
initvars.ps1
mailstorm.ps1
mailstorm2.ps1
multi-matrix.ps1
out-email.ps1
out-html.ps1
out-ie.ps1

In order to install Scriptacular just download the zip file from Vivek’s web site and extract all the content into the Scripts folders of the Exchange Server 2007 installation path. If you installed Exchange Server using the default settings it should be at c:\program files\Microsoft\Exchange Server\Scripts folder.

In this article we are going to work with the last two scripts of that list which are: out-html.ps1 and out-ie.ps1. Both of these can be used with an extra (pipe) at the end of any PowerShell commandlet, the first one generates the output in HTML format and the second one gets the output and displays it in an Internet Explorer session.

Now, that we know how to install it and which scripts we are going to work on, let’s see how to use them. Let’s say that we create a daily report of our Mailbox statistics and we have been running Get-MailboxStatistics select DisplayName,ItemCount Export-csv c:\report.csv. Now, let’s improve the output format using Scriptacular by just adding the following two extra commands:

Get-MailboxStatistics select DisplayName,ItemCount out-html out-ie

Now you can compare both outputs as shown in Figure 01 and Figure 02.

Figure 01: Output created by out-html out-ie
Figure 02: Output created by Export-csv cmdlet

We can go a little bit further and create a script to generate an html report using some scripts that we have just seen. The following three lines can be saved as a .ps1 extension and it can be executed daily, the result will be a file name containing month and day of the execution in the name, the content of this file will be the output of Get-MailboxStatistics.

$VarDay = (Get-Date).day

$VarMonth = (Get-Date).month

Get-MailboxStatistics out-html out-file c:\reports\MailboxStatistics-$VarMonth-$VarDay.html
Creating Anti-spam usage reports…

Before diving in the built-in scripts about anti-spam agents we have to be aware of how the transport agents record their actions in Exchange Server 2007. All operations performed by some anti-spam agents are recorded in text files in the directory AgentLog and this folder can be found at \TransportRoles\Logs\AgentLog\, and by default any Hub Transport and Edge Transport Server writes information in that folder. The only transport agents that are able to write in this folder are: Connection Filter, Content Filter, Edge Rules, Recipient Filter, Sender Filter and Sender ID agents.

The content of the AgentLog folder is a bunch of log files in a circular logging mode which means that when they reach the age limit of 30 days or 250MB (whichever comes first) in total they will be automatically removed. They are generated by day or 10MB whichever comes first, as well. An Exchange Administrator can enable or disable the AgentLog files but there is no way to configure path, age limit, maximum individual size, and maximum size for the directory. Each agent log file has the following data information:

Timestamp
SessionId
LocalEndpoint
RemoteEndpoint
EnteredOrgFromIP
MessageId
P1FromAddress
P2FromAddresses
Recipient
NumRecipients
Agent
Event
Action
SmtpResponse
Reason
ReasonData
Diagnostics

We can use notepad to open the log files (Figure 03) and all the information can be read from that file, we can also use Excel to separate the content in different columns.
Figure 03: Agent Log file opened in notepad

There is another way to read and sort information from those log files easily which is by using the Get-Agentlog cmdlet (Figure 04). The agent-log will display the same information but in a better way. We can take a closer look at the output of the get-AgentLog output and we are able to check who sent the message, who was supposed to receive the message, the action taken, and also the SMTP Response and Reason why the message was not delivered.
Figure 04: Get-Agentlog cmdlet output

Okay, now that we know how the anti-spam agents record the information and we also know how to use out-html and out-ie we can add one more item to our mix: anti-spam scripts that generate some reports about anti-spam activity .

The following anti-spam scripts can be used to gather information from Agentlog, as follows:

SCL Histogram: We can retrieve the information logged by the Content Filter agent and group it by SCL value. In order to sort the output, we can use the following cmdlet (Figure 05)

.\get-antispamSCLHistogram.ps1 sort-object Name

Figure 05: SCL Histogram

Top Blocked Sender Domains: Lists the top N sender domains that were blocked by anti-spam transport agents and we also need to specify if this information is coming from p1 or p2, where P1 information comes from message envelope (from header field) and p2 comes from message header (from header field). We can use the following command, as shown in Figure 06.

.\get-AntispamTopBlockedSenderDomains.ps1 p1
Figure 06: Top Blocked Sender Domains

Filtering Report: This script allows the administrator to list which agents are responsible for any of these options:

MessagesRejected
MessagesDeleted
MessagesQuarantined
Connections
Commands

For example, let’s use the following command to retrieve a list of the agents that are rejecting messages, as shown in Figure 07.

.\get-AntispamFilteringReport.ps1 messagesrejected

Now we know that the Content Filter is responsible for 546 messages blocked in our organization.

Figure 07: Filtering Report

Top Blocked Sender IP: Using this script we can list the top N blocked Sender IP, we can use the switch –top and specify how many entries we want to see in the output of the script, in the following script (Figure 08) we are retrieving the 20 top IPs that were blocked by our anti-spam agents, as follows:

.\Get-AntispamTopBlockedSenderIPs.ps1 –top 20
Figure 08: Top Blocked Sender IP

Top Blocked Senders: Shows a list of the top N blocked senders, we also have to specify if we are listing from p1 or p2 field, as shown in Figure 09.

.\get-AntispamTopBlockedSenders.ps1 p1

Figure 09: Top Blocked Senders

Top RBL Providers: Will list the top N Real time Block List Providers, the default value for top is 10 which is not applicable in the current environment because I am using only 2 RBLs, as shown in Figure 10.

.\Get-AntiSpamTopRBLProviders.ps1
Figure 10: Top RBL Providers

Top Recipients: This script gets the top N recipients that were blocked by anti-spam agents. To get the top 10 the following command can be used, as shown in Figure 11.

.\Get-AntispamTopRecipients.ps1

Figure 11: Top Recipients

Validating the Exchange Server installation

There is also a script which improves the reading of Exchange Setup Logs. During the installation process the setup creates a folder called C:\ExchangeSetupLogs and adds a lot of information that is being processed in the background into the ExchangeSetup.log file. We can go over that file using any text editor because it is a simple text file, however we can use GetSetupLogs.ps1 to see the same information. The difference is that it shows the warning and critical errors in different colors and it may help you in understanding installation troubleshooting issues.

To validate the setup installation log using the built-in script, just run .\Get-SetupLog.ps1 from the Scripts folder, as shown in Figure 12.

Figure 12: .\Get-SetupLog.ps1

There are some switches that may be helpful, such as:

tree: where the output will be in a tree format
error: only errors and warnings will e displayed

Conclusion

In this article we saw how the built-in anti-spam scripts gather information from agentlog to create some reports, we also saw how to use Scriptacular package to enable html and Internet Explorer output from a PowerShell session.
Finally, we can combine the out-html and out-ie with any of the scripts shown in this article in order to get better view of the anti-spam transport agents.

A Closer Look at Preparing Active Directory for Exchange 2007 (Part 1)

Introduction

Before you dive in and start installing Exchange 2007, you should take the time to understand the steps required to prepare your Active Directory environment to receive Exchange 2007. In this four-part article I will be taking a more in-depth look at what these preparatory steps are and, perhaps more importantly, what tools and processes you can use to determine whether they have completed successfully or not.

Before we get going there are one or two important things to discuss first. One statement that I’m sure you must have heard by now is that Exchange 2007 is only supported on 64-bit hardware. You are probably also aware that there is a 32-bit version of Exchange 2007 available for non-production scenarios such as training and lab environments. As you will see later in this article, some of the commands required to prepare Active Directory for Exchange 2007 must be run on specific servers that aren’t typically Exchange 2007 servers and could therefore be running on 32-bit hardware. If that’s the case and it’s known that Exchange 2007 isn’t supported on 32-bit hardware, how can these commands be performed with full support from Microsoft? In these cases, you should be aware that Microsoft does support the use of the 32-bit version of Exchange 2007 for performing specific Active Directory preparation tasks, such as extending the schema. With that in mind, make sure you have a copy of the 32-bit version of Exchange 2007 handy if you know that you have, say, only 32-bit domain controllers throughout your environment.

You will note throughout the steps in this article that it’s possible to have the process you are currently running perform the previous processes if they have been omitted. For example, if you forget to prepare the legacy permissions first, this step will be automatically performed when the schema is updated. You might wonder, then, if it’s better to just perform as few steps as possible rather than do each step individually. Personally I prefer to perform each step individually, based largely on the notion that I can check each step along the way, confirming that each process has completed correctly and resolving any errors as I go. Additionally, since some of the steps require different permissions levels, it’s possible to perform each step with the minimum permissions required, something that can be useful in larger and more secure environments.

Let’s look at the sample environment that I’ve constructed for this article. The environment consists of an empty forest root domain, neilhobson.com, and a single child domain, sales.neilhobson.com. The child domain contains an Exchange 2003 server and the associated user accounts that have mailboxes on this Exchange 2003 server. A new Windows 2003 server has been deployed into the child domain and will become the first Exchange 2007 server installed into this particular organization.

Preparation Commands

If you need to confirm the various setup parameters at any time, just run the following command from your Exchange source files:

setup.com /help:PrepareTopology

You can see the output in Figure 1; these are the commands that we will be covering within this article. Note the option for all switches to use a specific domain controller if required.

Figure 1: Setup.com Switches for Preparing Active Directory

With the commands in mind, let’s get going and look at them in detail.

Preparing Legacy Permissions

The first step to consider is whether your Exchange 2007 infrastructure is being installed into an existing Exchange 2000 or Exchange 2003 organization. If it is, you need to prepare legacy permissions. The reason for this centers largely around the Recipient Update Service (RUS) used in Exchange 2000 and Exchange 2003. I’m sure you know what the RUS does and so I won’t go into detail here, but if you don’t happen to know then you can check out Mark Fugatt’s or Rodney Buike’s articles on the subject. Due to a change in Exchange 2007, the RUS does not have the correct permissions to update email attributes belonging to users and therefore the process of preparing legacy permissions described in this section addresses this issue.

To prepare the legacy permissions you need to use the following command:

setup /PrepareLegacyExchangePermissions
That’s quite a lot of typing and the potential is there for you to input a few typing mistakes. Fortunately you can achieve the same result with a shorter command. I don’t know about you but if I can shorten my time at the keyboard and remove the potential for typing mistakes then that’s what I’ll do. Therefore, I’ll be using the shortened version within this article. It is:

setup /pl

Running this command will attempt to update all the domains in your forest. If you only have a single domain or if you want to prepare the legacy permissions in a specific domain, then the command to use is:

setup /pl:

For example, if I want to update the sales.neilhobson.com domain only, then I’d use this command:

setup /pl:sales.neilhobson.com

If you are updating a single domain, then the account you use to run this command must be a member of Domain Admins in the relevant domain and must also have been delegated the Exchange Full Administrator role. For those of you with multiple domains containing legacy Exchange servers, there are additional areas to consider and watch out for. If you have multiple domains containing Exchange 2000 or Exchange 2003 servers, you will have previously run the Exchange 2000 or Exchange 2003 DomainPrep process in each of these domains. It’s in these domains that the legacy permissions process must do its work and therefore the server on which you run the setup /pl command must be able to contact each of these domains. To run correctly in a multiple domain scenario, the account you use must be a member of the Enterprise Admins group.

In my example environment, I’m going to run the setup /pl command from my newly installed member server AD-CHE2K7. You can see the result of doing this in Figure 2.
Figure 2: Setup /pl Organization Checks

As you can see above in Figure 2, organization checks are performed first before the actual permissions are set. These checks ensure that the setting of the permissions can proceed and anything preventing this will be indicated to you on screen. You can see from Figure 2 that there are three issues highlighted:
There is a recommendation that .NET Framework 2.0 SP1 is installed; this is a recommendation only and you can therefore proceed without implementing it. However, you really should be following Microsoft recommendations such as this.
The legacy Exchange organization is not in native mode, something that prevents the setting of the legacy Exchange permissions. This is one of the main requirements of your legacy Exchange environment before introducing Exchange 2007, so make sure that you’ve made the switch to native mode before attempting to set the legacy permissions.
Finally note the information stating that the account Iam using is not a member of the Enterprise Admins group, which is a requirement in this case since I indicated that I wished to update all domains and not any specific domain.

Summary

That is it for the first part of this article. Here I have covered the background requirements for running the command that prepares the legacy Exchange permissions and we have seen a few common issues crop up. In part two, I will complete the look at preparing legacy permissions including examining the setup logs and also how you can determine whether this process ran successfully other than just relying on the setup logs.

Using Exchange Sever 2007 Built-in Scripts - Part 1: Managing Public Folder Replicas and Client Permissions

All scripts shown in this article can be found under the Scripts folder of any Exchange Server 2007 installation folder.
Public Folders is one Exchange feature that offers multiple management options. We will take a look at some of the principal management methods and then use some built-in scripts to demonstrate how we can manage some Public Folder features through them.
With Exchange Server 2007 SP1 we can use a tool called the Public Folder Management Tool which allows an administrator to create and manage Public Folders and System Folders in the same view, as shown in Figure 01.

Figure 01

We can use the Exchange Server 2003 Exchange System Manager to manage Exchange Server 2007 Public Folders. We can install the Exchange System Manager tool in a variety of operating systems (Windows 2000 Server, Windows Server 2003 or Windows XP), we just need to follow some prerequisites which depend on each operating system.
We do not need to have an Exchange Server 2003 in place to install the management tool. Let’s say that we have a pure Exchange Server 2003 and a Windows Server 2003, we just need to install IIS and put the Exchange Server 2003 installation disk on the drive, click on Exchange Deployment Tools, and then click on Install Exchange System Management Tools only. Follow the installation process and make sure that you select Exchange System Management Tools during the components selection.
One last thing to keep in mind to access the Public Folders using Exchange Management Tools is to disable the SSL requirement for the ExAdmin virtual folder.

-Log on to the Exchange Server 2007 box where the Public Folders were deployed.
-Open IIS (Internet Information Services Manager).
-Expand Web Sites.
-Expand Default Web Site.
-Right-click on ExAdmin.
-Click on the Directory Security tab.
-Click on the last button Edit... under the Secure Communications area.
-Uncheck the option Require Secure Channel (SSL).
Now, we can go back to the server which has the Exchange System Manager installed and expand the Public Folders (Figure 02). Do not forget to install Service Pack 2 on top of this installation because it adds a lot of useful Public Folders management resources.

Figure 02

We also have a third good option which is using the PFDavAdmin tool (Figure 03), where we can manage replicas, client permissions, limits, etc. In order to use PFDavAdmin we can download it from the Microsoft Download site.

Figure 03

By default any Exchange Server 2007 installation has a subfolder called Scripts where we can find a lot of useful scripts to help us out in some daily administrative tasks. In this article we are going over the scripts related to Public Folder management. These are all scripts that we are going to use in this article:

-AddReplicaToPFRecursive
-RemoveReplicaFromPFRecursive
-ReplaceReplicaOnPFRecursive
-MoveAllReplicas.ps1
-AddUsersToPFRecursive.ps1
-ReplaceUserWithUserOnPFRecursive.ps1
-ReplaceUserPermissionOnPFRecursive.ps1
-RemoveUserFromPFRecursive.ps1

We will test these scripts in a scenario where we have three servers (srv-ex01, srv-ex02 and srv-ex03) and all of them have the Mailbox Server role installed and a Public Folder Database mounted and operational. We have some Public Folders hosted on the srv-ex01 server and in this article we are going to configure replication among these servers. The Public Folder in place is on the first server and has three Public Folders (Finance, IT and Sales), the top folder IT has four extra additional folders. The Public Folder structure can be seen in Figure 04.
Figure 04

Before using these scripts, let’s go over the general usage instructions. First of all, you can edit them and create your own scripts, you can also use the switch –help to get help and examples on how to use the script, and finally always use “./” plus the script name to run it through an Exchange Management Console session.
A last warning is to use them against Exchange Server 2007, the parameter Server in all of the scripts must be an Exchange Server 2007 box.

Managing Public Folder Replicas

The Public Folder hierarchy is replicated among all servers, but the content replication must be defined by the Exchange Administrator. We are going to use the AddReplicaToPFRecursive.ps1 script to add another server into the replication list of a top folder and all sub folders, that way all the information will be available in both servers. The following syntax can be used, as follows:
.\AddReplicaToPFRecursive.ps1 –server srv-ex01 –TopPublicFolder “\IT” –ServertoAdd srv-ex02

Time to validate if the script worked as expected, let’s use the Exchange Management Shell to get such information. We can use Get-PublicFolderStatistics –Identify “\IT” fl cmdlet and look at Replicas attribute (Figure 05) and we will see the two Public Folder databases where the information is being hosted. Both machines srv-ex01 and srv-ex02 have the same Public Folder Database name.

Figure 05

We can also remove replicas from a folder and its subfolders, using the following syntax:
./RemoveReplicaFromPFRecursive.ps1 –server -ToPublicFolder “\FolderName”-ServerToRemove

Sometimes an Exchange Admin has a replication in place with two servers and a new server joins the organization to remove one of the existent servers. We can use the following example where we have srv-ex01 and srv-ex02 replicating and we want to remove srv-ex02 and add srv-ex03 into the current replica list, as follows:

./ReplaceReplicaOnPFRecursive.ps1 –Server srv-ex01 -TopPublicFolder “\Foldername” –ServerToRemove srv-ex02 –ServerToAdd srv-ex03

And the last but not the least script is the MoveAllReplicas.ps1 where we can move all the Public Folders from one server to another. This operation will remove the server from all replicas tab. It is a very useful script when we are decommissioning a server. The syntax is pretty simple:

./MoveAllReplicas.ps1 –Server srv-ex02 –NewServer srv-ex03

Note:When using the MoveAllReplicas.ps1 script the System Folders are moved as well.

Managing Users Permissions on Public Folders

Okay, in the last section we saw how to configure Public Folder Replication, now we are going to configure some client permissions on Public Folders. Let’s use the Public Folder structure shown in Figure 06.

Figure 06

Let’s say that we have to add a user as Publishing Editor in all IT Public Folders and subfolders, we can do that using the AddUsersToPFRecursive.ps1 script, and where we just need to specify a set of parameters where we define which folder, user, and permission will be configured. This syntax can be used:

.\AddUsersToPFRecursive.ps1 –Server srv-ex01 –TopPublicFolder “\IT” –User Anderson.patricio –Permissions {PublishingEditor}

Using the cmdlet above the user Anderson.patricio will be assigned as Publishing Editor in all folders and subfolders of the IT folder structure. We can define a customized set of permissions in a public folder, such as CreateItems, ReadItems, CreateSubfolders and so forth. We can also define permissions based on Roles. Each role has a set of pre-defined permissions to be applied.

To validate if the permissions are in place, we can run this cmdlet:
Get-PublicFolderClientPermission \IT fl

Both steps are shown in Figure 07.

Figure 07

We can change the user permission in a folder structure using the script called ReplaceUserPermissionOnPFRecursive.ps1. Let’s say that we want to change the recent user that we have just added to be PublishingAuthor instead of Publishing Editor, in order to do that we can use the following syntax:

./ReplaceUserPermissiononPFRecursive.ps1 –TopPublicFolder “\IT” –User anderson.patricio –Permissions {PublishingAuthor}

We are also able to remove a user from a Folder and subfolder using the RemoveUserFromPFRecursive.ps1 script, as follows:

./RemoveUserfromPFRecursive.ps1 –TopPublicFolder “\FolderName” –user UserNametobeRemoved

You will be asked in each folder if you are sure you want to remove the specified user. Just say Y and hit enter to confirm.

Another possible option is to replace a current user listed on the Public Folder permissions for another user. This script does not play with the permission just changes one user for another. All permissions in place will not be changed.

./ReplaceUserWithUserOnPFRecursive.ps1 –TopPublicFolder “\FolderName” –UserOld UsertobeReplaced –NewUser NewUserName

Conclusion
In this article we have seen how to use the built-in scripts that come with Exchange Server 2007 to manage Public Folders. Using such scripts we are able to manage Public Folder replicas and client permissions using a single line script command.

Cluster configuration recovery tools in Windows Server 2008

Microsoft clustering services on versions prior to Windows Server 2008 used a command line tool to fix drive issues. Windows Server 2008 puts this in the interface, making drive tasks more accessible.
—————————————————————————————————————
If you’ve done moves of shared storage in a cluster configuration, you may have had to use various recovery tools in versions prior to Windows Server 2008. Specifically, the resource kit tool dumpcfg.exe is used to repair drive signatures depending on certain conditions that could cause the shared storage hard drives to lose the disk signature. This can be quite a scary endeavor, and the frantic search for the resource kit tools to get the dumpcfg.exe tool from the install media only then offers little comfort on the repair of the situation. Remember that this situation is a safeguard of the clustering services, and that with the proper recovery techniques, the system can be running again quite quickly.
Windows Server 2008 offers key improvements in the clustering services functionality, and drive recovery is one of the more important features. In lieu of entering a command like


this:dumpcfg -s 0ADD5FAE 1


Windows Server 2008 allows you to correct these types of issues one of two ways. One is within the cluster administrator console with a new repair functionality with the physical disk resource. The other way is within the diskpart utility. Diskpart is not new to Windows Server 2008, but the functionality is. Figure A shows a disk having its signature changed to the value in the prior example.


Figure A


Note: You should only use this command where the signature has been reset for another reason, and the drive is inaccessible. Reverting it to the signature ID that the system is expecting will correct that issue.
The new functionality of the cluster resource manager and the additional diskpart commands are a welcome compliment to your arsenal of recovery. If Windows Server 2008 clusters are in your future, it is a good investment to allocate the time to set up a test cluster and go through the recovery process with shared storage using both mechanisms to access the disk signature configuration.

Refurbished servers - good deal or something to avoid?

Although the economy is not exactly in great shape these days and the news of downsizing keeps coming, organizations must continue business as usual as much as possible. That means that IT in those organizations needs to keep forging ahead. Of course, this also means that servers need to be upgraded and replaced and new servers need to be installed in order for the organization to continue to implement new technology initiatives. If your server budget is shrinking and the expectations on your services have not kept pace, how can you keep up?
Note: I’m going to focus on Dell refurbished equipment here since I’ve had quite a lot of experience with them.
Refurbished servers can provide you with a great way to keep the upgrade cycle in place at a lower cost than buying new servers. Often sold for much less than new equipment, refurbished servers generally carry the same warranties as brand new equipment and can sometimes be available more quickly since they do not need to be built.
For example, at Westminster College, we use Dell M600 blade servers. Our current servers are configured with dual quad core 2.33 GHz Xeon processors with 32GB of RAM and two 73GB SAS disks. A few months ago, before the M600’s were available in the Dell refurbished store, we paid around $4,000 for each blade server with this configuration. Last night, in perusing the Dell refurb store, I found M600’s with dual quad core 2.8 GHz Xeons processors and 32 GB of RAM for less than $2,500. That difference is pretty significant. If you need a lot of servers, the difference can add up very quickly.
On the downside, if you start buying refurbished equipment, it’s more difficult to buy servers with a consistent configuration. You get what you get, as it were. If you need ten servers and you hit the store at the right time, you might get lucky, but you can’t count on it.
The main worry with regard to refurbished equipment lies in the warranty service and stability. As I mentioned, Dell refurbished equipment usually ships with the same warranty that would be included with new equipment. Further, you can choose to extend the warranty for an additional charge. As for stability, speaking from experience, I’ve never had a bit of trouble with any of the servers I’ve purchased refurbished. In addition to servers, I’ve also purchased a number of refurbished Dell desktop computers, laptops and storage devices.
Pros
You can save a whole lot of money by buying refurbished equipment
The equipment usually includes the same warranty as new equipment
Cons
You may not be able to locate the exact equipment configuration that you need
There is a stigma attached to the word “refurbished”
If you’re buying in large volume, you may not be able to get a better deal in the refurb store, but it definitely doesn’t hurt to check, and you may be able to extend that shrinking budget just a little further.

Five reasons to kill IT projects

A survey of IT experts revealed 43 percent of their organizations had recently killed an IT project. The study, conducted by ISACA, an independent IT governance group, highlighted the top 5 reasons these organizations named for terminating projects prior to completion.
Here’s the list, with my commentary on each issue:
1. Business needs changed: 30%
There are many conditions and situations where a business legitimately changes its requirements after starting a project. If the project no longer provides meaningful value, then it’s best to stop throwing good money after bad.
On the other hand, some organizations deliberately obscure a flawed project requirements process by claiming business needs evolved. Obviously, that’s unhealthy and a true sign of failure.
2. Did not deliver as promised: 23%
This is a typical expectation-setting problem: promise anything to get funding and worry about the consequences later. Shortsighted managers don’t realize that funding is less important than delivering substantive value. Failure is inevitable when managers don’t clearly identify and deliver business value.
In some cases, the project really did provide value, which the organization did not recognize due to communication problems. I recently blogged about one CIO seeking a publicist, presumably to address this issue:
Many organizations take a CIO for granted when his IT department consistently delivers the goods without fanfare and attention; sadly, this human failing is all too common. In that case, PR might be a great idea, especially if the CIO isn’t a great communicator. Of course, the CIO should improve his communication skills, but that’s another story.
3. Project was no longer a priority: 14%
If the organization shifted direction without good reason, thus making the project superfluous, then flawed strategic planning was the culprit. However, if business requirements changed for a good reason, as suggested in point one, there’s not necessarily a problem.
In general, and this is an obvious point, canceling projects without a darn good reason is a definite sign of failure.
4. Project exceeded the budget: 13%
On the surface, over-budget projects are the basic metric for failure. I’m actually surprised this number isn’t higher, because unanticipated cost is always such a clear red flag.
At the same time, some projects run over-budget due to intelligent scope increases that provide additional value. For example, while automating two departments, the project team realizes it can add a third department for only marginal increases in cost. In such cases, going forward is probably the right decision despite the higher spend.
Although tempting to use budget performance as simple metric of success or failure, that approach can be overly simplistic and ignore important nuances related to business value. Nonetheless, anytime a project goes over-budget the team must offer a detailed explanation.
5. Project did not support the business strategy: 7%
This classic indicator of failure often suggests a project rooted in poor requirements analysis. However, as with previous points, it’s also possible changing business needs made the original project goals obsolete.
=====
The survey is most interesting to highlight significant issues related to project failure. However, some of the questions are too ambiguous to provide straightforward conclusions. In general, understanding whether a project is successful requires examining the business environment and context.

How to work with a headhunter

The average person currently between the ages of 25 and 35 will probably have 8 jobs over their lifetime. Presuming they retire at age 70, that means they’ll spend about 5 years per job, give or take a year.
How long have you’ve been in the same role? Is it time to look around? Even if you don’t think that the time is ideal from your perspective, keep in mind that this economy may take that decision out of your hands.Here’s a good rule to observe: Leaving your fate in the hands of others is just dumb. It’s kind of like, “managing by crossed fingers”.
Companies are often under more duress than they seem. Burdensome loans or tough business agreements may outweigh how they appear to be doing from an outsider’s perspective. We see clear evidence of this pretty frequently with the latest bailouts. Just 2 days before the Feds saved Citibank (one of the world’s largest banks) the CEO made the statement that they had ample reserves to survive on their own.
Additionally, just consider the bosses of today: With fewer of them, they may simply be too busy to look after you, your growth, or even your employment. And let’s not forget that old adage about the world getting flatter all the time. There are a lot of individuals who would be very happy to do your job, often for less money.
So, get proactive. Here’s a checklist of the steps everyone should take at least once a year:
1. Keep your resume current. If you aren’t sure about how it should look, go to PongoResume for tips and ideas. I recommend it be just 1 page in length. Treat it like the headline on a newspaper - all you want to do is catch the eye of the reader and get a foot in the door. If anyone’s interested, they’ll reach out to you. Then you provide a more detailed paper.
2. Find headhunters / recruiters to work with. I suggest having a relationship with at least two individuals. Three is better. They can be national organizations or local - one of each is smart because different employer HR Departments will use different approaches, so this will cast a wider net. In most cases, headhunters are paid by the hiring company not the job seeker. If the one with whom you connect asks you to pay for their service, be cautious. Ask if they get paid by employers for filling their needs and if so how much. The best headhunters don’t charge individuals. When they do charge, it’s only a token amount to put you on file.
3. Cozy up to your new “career partner”. Most of the good ones are really busy. So you need to help them understand that you’re different /better/ very interesting. Ideally they’ll smell gold when they talk to you because you can show them how really good you’d be for any company that takes you on. Many people don’t like having to “sell” themselves; but the time you spend helping your headhunter to see your greatness; the better an outcome you’ll experience. Without looking like a spammer or some weirdo, send them interesting bits of information, and “drop in” on them by email simply to wish them a successful day. In the marketing business, this is called keeping “top of mind”.
4. When you do get to the interview stage with a prospective employer, ask the headhunter for her / his advice. Then take it. It’s not to your benefit to get into a debate with the headhunter about why you have a better idea about what to say or how to proceed in the interview. They probably know the client and they’ve definitely got more experience with this than you.
In the interview use the 40/60 rule. That means: let the other person talk 60% of the time. A common mistake of job interviewees is that they talk too much as they strive to show how great they are. At the very least it’s a turn-off. Worse, it may cause the interviewer to question your listening skills (never a good thing).5. At the end of the interview, ask how the interviewer sees you as a candidate in this search. I find that most will tell you honestly what they think. Thank them for their feedback. If possible, ask if you can call them to follow-up on the progress. Don’t accept the old, “leave it with me - I’ll get back to you” stuff. That will just cause you increased sleeplessness and more acid reflux.
6. The next day after the meeting, call the headhunter to brief him/her and also to ask what they’ve heard. Accept what they tell you. Don’t get defensive. (S)he is your career partner and has no reason to give you bad advice.
Afterward, write the interviewer and thank them for seeing you. Tell them a couple of reasons why you know you’d be a great fit for the job and company and say that you want it. Remind them you will call to follow-up on the progress of the search.
Always keep your headhunter up to date and copy him or her on your communications with the job prospect.
Good hunting!

Risk management: Implementing an enterprise program

Once my company identified the need for a risk management program and defined the threat and developed the framework, we focused our efforts on implementation.
The implementation of a risk management framework across my company has proven to be a success with a significant increase in the level of awareness associated with risk management concepts, tools, and techniques. Risk management has increasingly gained acceptance within our organization, and we have fully integrated risk management with project management. We haven’t met all of our objectives, but we are making progress. The goals we have achieved include:
We have a clearly documented risk glossary. This glossary has streamlined the communication process. It has promoted the use of consistent terminology, which increased the effectiveness of exchanging information about risk across the enterprise.
We have a systematic set of risk management processes for identifying, analyzing, developing responses, monitoring, controlling, documenting, and communicating risks. There are numerous tools and techniques available to support these processes. These processes have proven to be flexible enough to cater to a wide range of projects and business scenarios.
We have identified and documented many risks that would have been otherwise unforeseen. This proactive approach has enabled us to take actions early in the project life cycle to avoid and mitigate threats before they materialize and become problems. This is evident by the sharp decrease in the number of issues and problems that we are facing on projects. Obviously, we will not be able to prevent problems from occurring, but we can minimize them.
We have access to consistent, reliable, and accurate historical data. It allowed us to enhance our products and processes.
We have improved the ability of our organization to manage risks across projects rather than make decisions in isolation. A program manager can now assess the risks across several projects rather than deal only with risks on a project basis.
Resistance to change
Any project like this is associated with a change. We need to take special care to accommodate the psychological needs of those going through change. Failure to do so may lead to a negative impact on an otherwise successfully implemented project.
We used the following techniques to manage the change associated with the introduction of the risk management framework:
Communication: We communicated the purpose, the intent, and the logistics of the framework often and in various forms.
Front line support: To facilitate the transition to the adaptation stage, we offered users support, advice, access to information, tips, training, tools, etc.
Management support: Top-level support was very essential. Upper management made it clear that the organization was fully committed to this endeavor. Finally, we had to reward users once we achieved our objectives. The rewards were in the form of a party, letters of achievement, etc.
Lessons learned
Like any project, the risk management framework has successes, failures, and lessons learned. The project showed us that:
We underestimated the amount of loyalty that people have to their old tools and work habits. It took us a considerable amount of time to convince several individuals of the benefits of adopting the new tools and techniques.
We assumed incorrectly that all business areas were ready to implement the framework. We had to spend a considerable amount of time on preparing some units.
We needed to better manage the expectations during the piloting phase. We had to constantly remind people that these pilots were designed to enable us to assess the framework. We learned to state these objectives upfront.
We assumed that all members of the steering committee were committed to the project. This assumption was not valid, as we learned when people left the committee and new people came on board, creating a certain amount of confusion and uncertainty.
We adopted the wrong strategy by pushing the use of certain tools and techniques to maintain consistency across the organization. Not all risk management tools and techniques would be applicable on a specific project. Users should select the most appropriate tools and techniques from the risk management toolbox.
Continuous improvement
We believe that, to successfully manage risks, we need to continuously improve and maintain the same level of commitment to the risk management framework. This strategy will enable us to further develop the framework as the business environment changes.
Our first challenge was to maintain the same level of commitment. We knew that the real benefits are long-term ones. We intended to maintain a high level of awareness by continuously reminding people about the importance of the risk management framework. A special section in our in-house bulletin was fully dedicated to the framework. Each issue contained a message from a top-level manager about his own positive experiences with the framework.
We are continuously updating the tools and the techniques used in the framework based on feedback from participants and are continuously revisiting these tools and techniques to ensure their effectiveness and applicability.
We are utilizing the problem and issue logs to enhance the framework and produce an assessment of our identifying and planning processes. When a threat materializes, it becomes a problem. This means that either we missed it in the identifying phase, or we did not plan for it effectively in the planning phase.
Duration
We can reasonably estimate the amount of time spent by the project team (project manager, technical writers, and consultant). It took us (the project team) 180 man-days from the development of the glossary to the implementation of the first pilot. We spent 100 man-days on piloting exercises. We consumed 120 man-days of consultancy work, including time allocated for knowledge transfer.
Summary
By being proactive rather than reactive in managing risks, we are able to deal with threats before they become problems. We are able to pursue opportunities as early as possible. This enables us to be flexible and effective in an environment characterized by continuous change and intense competition.

Five things your manager could be doing better

I don’t know your manager personally. He or she may be perfectly wonderful. And I’m not indicting all managers as being somehow deficient in their jobs. But chances are, all managers could use some strengthening in certain areas. Here are some ways most managers could improve:
1. Dealing with personnel problems sooner rather than later. Nothing demoralizes employees more than working with a co-worker who is a problem that no one will deal with, either because doing so would be “uncomfortable,” or the happiness of the team is just not a big priority to the manager. Basically, it ends up with the sub-par employee holding everyone emotionally hostage.
Although it’s never pleasant to deliver criticism, the burden should never outweigh the need. If someone is a personnel problem, he or she has to be responsible for the consequences. I’m not suggesting anything that would involve weaponry or a stockade. I’m not even saying that criticism should be blunt and loud, by any means; it can be finessed. But a manager should never be apologetic for having to criticize the work performance of a team member. If Employee A exhibits behaviors that negatively impact the rest of the staff, then Employee A needs to be made aware that it won’t be tolerated.
If not, what’s the message to the rest of the team? I can show up late, push my work off on others, be intimidating, be toxic, and watch YouTube videos all day at work. Who’s going to say anything?
2. Giving more positive feedback. Many managers operate from the assumption that their employees will know they’re doing OK as long as they aren’t reprimanded for something. This is not a productive way to operate. There are ways for staffers to infer that they’re doing a good job, but why should they have to do that? Many people don’t look at things from a “no news is good news” standpoint. You’d be surprised at how motivating it is for an employee to find out his or her performance is noticed for good reasons.
Good managers notice good performance — and they don’t just wait until performance review time rolls around to express their appreciation.
3. Leading more, managing less. Management establishes the framework for work, while leadership provides the inspiration for it. Successful IT managers learn to be both a good manager and leader, depending on the needs of the team and the situations they are addressing. How does one lead? First, communicate more. Although “meetings” have become four-letter words in most organizations, they really are essential in communicating the vision of the company and explaining how employees can work to make that vision come true.
Second, IT managers need to work harder toward establishing their group’s reputation in the company. This involves creating constructive partnerships with people in business management and other departments. Good IT managers act as their team’s PR agent.
4. Be an advocate for the team. Sometimes in an attempt to make the company vision happen and look good in the process, the overzealous manager will take on more and more work that he then promptly passes on to the team. The problem with this is that the team comes to feel that their manager is not an advocate for them, and that he hasn’t even bothered to see what’s already on their plate before he piles more on. Employees soon start to feel like it’s not so much what they’re doing for the company, but more about what they’re doing for their manager’s career. Good managers know their team’s bandwidth, and they learn to say no on their team’s behalf.
5. Be open to feedback. Strong managers don’t just pretend to be open to feedback — they listen to new ideas and discuss their pros and cons with the person who presents them. Good managers aren’t threatened by employees who have better ideas than they do. Good managers are also able to admit they’re wrong. They know that doing this is not the same as admitting they’re incompetent.

10 things you should do near the end of a project

Depending on the size of your organization, you may treat project management as a casual practice or you may have an involved PMO. In either case, you probably go through the typical inception, elaboration, and construction phases of a project. But when it comes to the end of a project, many project managers come up just short of the finish line. Failure to handle the final steps can add confusion to an initiative and may lead to customer dissatisfaction, unhappy staff, and a project dragging on longer than necessary.

Here are a few things you should be thinking about when you get to the end of your next project. Some of these items are purely administrative, but many of them will help get you one step closer to ensuring that your project is successful.
#1: Finalize testing
Testing can be a drain on people, and many of us don’t like to do it — especially when it takes a few rounds. I have seen complex projects that were four to six months long have a day or two scheduled for testing. Not scheduling an adequate amount of testing usually ends up with problems occurring during the first few weeks of an implementation. Don’t take a shortcut here and minimize the importance of testing; otherwise, you’ll take on the additional risk of having a painful rollout.

#2: Finalize training
Users? Who cares about users? Well, many projects are done for their benefit, so make sure you have all your testing materials completed and delivered. Failure to do so will most likely manifest itself in the form of angry phone calls from irate users in the middle of the night.

#3: Validate deliverables
You’ve checked all your boxes and cleaned out your inbox, and you really think you’re done. But what does your customer think? Schedule time with customers to review all the deliverables and ensure they have been met. In some cases, there may be a few outstanding issues still unresolved when you get to your scheduled end date. Early on in your project, you should have made an agreement that determines how this will affect your end date if this situation occurs.

#4: Get project signoff
After you’ve agreed that all the deliverables have been met, request a formal signoff on the project documentation. Doing so helps ensure that everybody is in agreement on the state of the project. Since this signoff usually signals the formal end of the project, be careful not to make your customers feel pressured into signing. If they do this without understanding what it means, you will likely end up with an unsatisfied customer if an issue arises at a later date.

#5: Release the team
Now that the project is done, where is your team going? Depending on the organization, they may be sent back to a development pool or into the business. Or maybe they need to go drum up some work for themselves within the company. No matter what it is, make sure you spend time with them and set a clear end date for when you no longer need their services. Also don’t forget that you probably need to complete any performance review documents that need to be added to their file.

#6: Analyze actual vs. planned
Resources. Did you really get away with only one developer/tester for 10 weeks or did you need to scramble and get more people? What about the amount of time you scheduled for your business partners? Understanding how well you hit these targets will help you better allocate resources for your next project and set more realistic expectations when it comes to a project’s duration.

Budget. How much was the project going to cost? Did you come in on budget, under budget, over budget? Sitting down to understand the answers to these basic questions should give you some insight into a critical area of any project.

#7: Archive documentation
During any project, we seem to create huge amounts of documentation. It can range from scope documents and project plans to contracts and meeting minutes. Whatever it is, when you are done you should have someplace to keep it based on the retention policy of your company. You’ll be glad you did when your phone rings two years from now and somebody asks you to explain the rationale behind a choice you made during the course of the project.

#8: Ensure contract closure
It’s not unusual for a project to have its own budget. You also may have contracts for hardware, software, or professional services. When you’re done, make sure that you verify that all the terms of your contracts have been met, request final invoices from vendors and submit them to AP, and close out any associated financial accounts, if necessary.

#9: Conduct a postmortem meeting
What types of risks did you identify and mitigate? What went really well that you want to ensure you do again next time? Have a meeting with all the project stakeholders and relevant participants to provide them with a forum to express any lessons learned.

#10: Perform a self assessment
So it’s finally over. After all the hard work has been completed, you’ve made sure that all the i’s have been dotted and all the t’s crossed. Now what do you do? It’s important to get some feedback on your performance from the people you interacted with during the project. If you have the opportunity to send out a 360-degree feedback survey to as many individuals as possible, I would recommend it. It will help you assess how you’re progressing and will give you some great direction in deciding which personal growth opportunities you should focus on.

This list won’t be the same for everybody and will depend on your organization and how it implements projects. But if you can do them, it will always make the transition to the next project smoother.

Time for transition? Vista vs. XP, 32-bit vs. 64-bit

I was around during the days of the tech industry’s move from 16-bit to 32-bit computing. Although it was chaotic at times, I don’t remember things being quite as convoluted as they seem to be today. Of course, I could be remembering incorrectly!

Today, IT leaders are considering mass migrations to new operating systems, new Office suites and to new 64-bit architectures. On the surface of things, answers to these questions may seem easy, but as you dig deeper, things aren’t quite so clear.

Vista vs. XP
You’ve probably read article after article from IT pundits indicating that Vista isn’t ready for prime time. And, in this section, you’ll read yet one more opinion on this matter. Quite frankly, I really like Microsoft products, so it’s disappointing to write something negative about what should have been one of the company’s crown jewels.

Vista isn’t ready for prime time. This opinion is not based on reading articles or watching the news. It’s based on experience and fact. I’ve been running Vista since the day it became available on Microsoft’s licensing download site. Prior to that, I experimented a bit with the beta releases. To say that Vista is buggy and unreliable is the understatement of teh year. My main reason for running Vista on my office machine was to better familiarize myself with the product. At home, however, I needed to be able to use RAM beyond 4 GB, so I installed the 64-bit version. Although my main need–the ability to access RAM beyond the 4 GB barrier–has been satisfied, the overall experience hasn’t been smooth. Drivers haven’t been a problem, either. I run a Dell Precision 690, so my driver needs are pretty standard. I’m not running anything weird. However, other things simply don’t work right. For example, on this system, I’m also running Office 2007 and I’m not able to save files using some of the new file formats. In particular, Excel is a mess. I can save files just fine in XLS format, but not in XLSX. OneNote? Forget it. The cache is corrupt, so until I can rebuild my system, I’m running OneNote in a 32-bit virtual machine. Of course, Ive Googled my problem until my fingers hurt, but nothing has yet rectified the problem. Permissions problems? Yep. At times, I get random “access denied” errors to my stuff. At first glance, some may say that I have serious virus or spyware problems or that I screwed up the install somehow. But, with almost 15 years of deep Windows experience and an MCSE, I’m pretty confident in my ability to install Windows and clean my machine. Between my own experience, as well as the experiences of my staff and the feedback we’ve gotten from our user base, we’re sticking with Windows XP for the foreseeable future.

Office 2007 and permissions on my XP machine? Smooth sailing all the way.
That said, Microsoft has made a lot of noise lately about end-of-lifing Windows XP based on their product support cycle. Personally, I think Microsoft does a pretty good job supporting older products and feel that, by the time a product is no longer supported, there is a viable replacement on the market. This time, however, Microsoft needs to take a hard look at the market and the feedback they’ve received and be honest with themselves. After a ton of time developing Vista, I can imagine that the last thing Microsoft wants to do it publicly admit that it’s not the product it was supposed to be and their sales figures seem to back them up. It’s important to note, though, that new PCs that are shipped with Vista and then downgraded to Windows XP, are counted as Vista sales. Westminster College this year purchased around 90 computers with Windows Vista. Every single one was downgraded to XP. Now, I know that 90 computers is a miniscule fraction of PC sales, but we’re far from the only organization with a similar downgrade policy that purchased computers with Vista.

If Microsoft sticks with their original plan, we may all be forced to the Vista bandwagon whether we want to ride it or not. Even though our experience thus far hasn’t been stellar, we’ll continue to evaluate the system for an eventual deployment. Maybe Vista will stabilize at some point before Windows 7 is released. By the way, for Windows 7, I’d love to see Microsoft jettison built-in backward compatibility in favor of a totally revamped operating system and use their Virtual PC/Virtual Server/HyperV layer to achieve backward compatibility as an optional component. I seem to recall that another computer manufacturer went down this road a while back with great success.

32-bit vs. 64-bit computing
At the same time that organizations are considering their Vista plans, the 32-bit to 64-bit migration possibility is on the table. From what I’ve seen, heard and experienced, most organizations are staying with 32-bit on the desktop and moving to 64-bit slowly in the data center. Again, Microsoft has not necessarily made the migration decision a no-brainer. In some cases, 64-bit isn’t optional. For example, if you want to run Exchange Server 2007, in production, you need 64-bit Windows whether you want it or not. But, the choice isn’t always so clear cut. Imagine, for example, an organization that has made the decision to move to 64-bit Windows for its SQL Server 2005 databases, but is sticking with 32-bit for other servers–perhaps they’ve virtualized some of their environment on Virtual Server 2005, which doesn’t support 64-bit guests.

It’s a sensible move, but not without its own complications. Take System Center Essentials, for example. Before System Center Essentials SP1 was released, SCE couldn’t run in “mixed mode”. That is, if SCE was 32-bit, the database server had to be 32-bit as well. These kinds of incompatibilities make organizations very wary about moving to a new platform, and reasonably so. Who wants incompatibilities where there simply should be no problem? Why would products be released at this point that have such obvious lack of interoperability in reasonable environments? Sure, with SCE SP1, 32-bit/64-bit mixed mode operation is now possible, but there simply has to be more emphasis on making sure that every new product can run where it needs to run–out of the gate. IT folks are always asked to do more with less and with less time than we had in the past. Make our lives a bit easier!

Even today, Windows Home Server connector software and Microsoft’s Groove clients do not support 64-bit clients.
So, what’s the solution? Careful research and a good plan. If you need Groove, you can’t go to 64-bit Vista. If you need 32-bit SCE, make sure you have a compatible database server and so on. You may still get frustrated because a particular combination doesn’t work, but at least you won’t be surprised.

Now, I’ve done a lot of Microsoft bashing in this posting, which isn’t my modus operandi. As I stated earlier, I actually like Microsoft’s product a whole lot and find them to be excellent solutions. Although we’re facing some serious transitional pain today, I’m confident that Microsoft will learn from its mistakes and release a Windows 7 that is truly innovative and will continue to recognize the importance of 64-bit and better synchronize their 32/64-bit platforms.

10 common mistakes you should avoid when flashing your BIOS

The BIOS (Basic Input/Output System) is critical to the proper operation of your computer. It is the first code that is executed at start-up and defines the way your motherboard will communicate with the system hardware components.


The decision to flash your BIOS should not be taken lightly. It is essential that you do it mistake free if you still want to be able to use your computer.

For the purposes of this article I am going to assume that you understand the risks of flashing your BIOS and have a good reason for upgrading your existing BIOS. If are not familiar with the basics of flashing the BIOS or if you are not 100 percent sure that flashing your BIOS is the right thing to do then please read the companion article Three Good Reasons for Flashing Your BIOS.


Disclaimer: Flashing the BIOS incorrectly can lead to an unusable system. Flash the BIOS at your own risk.


I have detailed ten common mistakes that are made during a BIOS upgrade listed in order from the beginning to the end of the BIOS flashing process.


1. Misidentification of your motherboard make/model/revision number
If you built your computer then you know the brand of the motherboard that you purchased and you will also likely know the model number. The revision number may be less well known to you.


If you purchased your computer prebuilt, as most people do, then you probably don’t know what is under the hood. You might be able to get the information by entering the serial number of the PC on a Web site, but when it comes to flashing your BIOS you need to be 100 percent accurate and the information on the Web site could be incorrect. The only way to know for sure your motherboard make is to pop off the side panel or open the case and take a peek. (Figure A) Look for the manufacturer, model number and a revision number. (Figure B)


Figure A


The motherboard make is printed on the motherboard. Do not get the name from the fans.


Figure B


The motherboard model can be printed on the motherboard or as in this case, on a sticker placed on the motherboard.


You can also get pertinent information from the initial POST screen. (Figure C) The first line in the upper left portion of the screen shows the BIOS maker and version. The second line shows the motherboard model, BIOS version and date. The lower left section of the screen shows the BIOS version date, motherboard model and BIOS ID.

Figure C

2. Failing to research or understand the BIOS update details
Even properly researching the changes in the BIOS upgrades may not be enough to completely understand exactly what was changed. Often these BIOS upgrade notes are written by techs with little or poor knowledge of English and rarely are the details noted in full. It is not uncommon to find something similar to this.X38-002A BIOS Upgrade

21/10/2007

Fix to E6400 S3 resume problem

There are several issues with this. You need to know what E6400 and S3 are. Even after learning that an E6400 is an Intel Core 2 Duo CPU and S3 is one of four sleep functions in the PC’s power settings, you then need to know if you have an E6400 CPU. If you do, are you using the S3 STR (Suspend To RAM) Sleep option in Windows and having problems with it?

You can’t expect your motherboard manufacturer to explain what E6400 and S3 mean, but they should be able to explain what the problem was that was fixed. Perhaps if more people requested this, more detailed information might be included in the BIOS update notes in the future.

Most BIOS updates are cumulative. You will need to review all of the BIOS update notes after your current BIOS version in order to know all of the changes made with the latest upgrade version.

3. Flashing your BIOS for a fix that is not needed
As you can see from the example above, it is often difficult to understand exactly what fix was implemented with a BIOS upgrade. It is equally difficult for the average PC user to determine if any of the hardware in their system is included in the fix. As a rule of thumb if your computer is operating normally, leave it alone.

If you are unsure if a BIOS update will fix a problem that you are having with your PC, you can ask for more information from the manufacturer. Be 100 percent sure that the BIOS update will fix any issues that you may be having before flashing the BIOS. Hoping a BIOS update will fix a problem that you are experiencing is a poor reason to risk a BIOS flash.

4. Flashing your BIOS with the wrong BIOS file
Most BIOS updates come as a zipped file containing the binary code file, the flash utility, and sometimes a README file. Flashing the erasable memory of your BIOS with the wrong code is almost certain to cause failure the next time you try to boot. Be careful when selecting the file. Many motherboard model names are similar within a single manufacturer. Download the file for the exact make/model/revision of your motherboard.

The flash utility included in the download should match the BIOS manufacturer information on the initial POST screen. In the example above, I have an Award BIOS from Phoenix Technologies (Phoenix Technologies and Award merged in 1998). The older version of the Award flash utility that I received in my BIOS update file was called AWDFLASH.EXE. The latest version is called AFU869.EXE. The acronym AFU stands for the Award Flash Update Utility. It also coincidentally stands for what happens if your flash goes bad.

5. Using an outdated version of the manufacturer flash utility or tool
You may be tempted to pull out the CD that came with the motherboard or computer and use the utilities on the CD to flash your BIOS. It is well worth your time to download the latest utilities from your motherboard manufacturer or computer maker. There is usually a good reason why a new version of the flash program has been made available.

You will need to go to the motherboard manufacturer or computer makers Website to download the latest version of the BIOS code anyway, so plan to download the latest flashing utilities or tools at the same time.

6. Not following or understanding the motherboard manufacturers specific directions
Most of you reading this article and considering a BIOS upgrade are probably of the male persuasion. Like me you probably don’t like reading and following directions. This is one time when reading and following the motherboard manufacturer instructions are essential. Each motherboard has specific steps that must be followed to have the upgrade succeed.

One example of this is a jumper on some motherboards or a setting in some BIOSes that must be changed to enable BIOS memory writing.

Instructions for flashing your make of motherboard can usually be found on the manufacturers Website. Specific instructions are sometimes placed in a README.txt file that comes with the BIOS flash file. Look for and read the instructions in this file carefully.

If you have read all of the steps needed to flash your BIOS and there are some steps that you don’t understand, get help from the manufacturer or consider having a professional do the install for you.

7. Flashing your BIOS without an UPS or at higher risk times
It is best to flash your BIOS with a UPS installed to provide backup power to your system. A power interruption or failure during the flash will cause the upgrade to fail and you will not be able to boot the computer.

Don’t assume that this can’t happen to you. I was converting the file system on the root drive on a PC once at 2:00 in the morning when I heard a loud pop outside. The lights blinked and the conversion failed. Apparently a transformer had blown in the neighborhood interrupting my power just long enough to ruin my day, or rather night. I had to reinstall the operating system from scratch.

If you don’t have access to a UPS, flash the BIOS in the late evenings or when the risk of power outages are lower. Avoid flashing the BIOS during thunderstorms, windy days, high peak electrical usage, prime drive time or any other time when power outages are more likely.

8. Flashing the BIOS from within Windows with other applications running
Flashing your BIOS from within Windows is universally discouraged by motherboard manufacturers. If you absolutely must flash your BIOS from within Windows and are willing to accept the additional risks involved, close all running applications and unnecessary processes. Antivirus processes running in the background are notorious for causing problems.
TechRepublic has a list of services that can be disabled in XP and in Vista.

9. Flashing an overclocked system
Some information I found while researching this article recommended not flashing your PC while it is overclocked. You may be able to successfully flash your overclocked system, but why take the additional risks? I don’t recommend overclocking except for the most experienced users with minimal changes and only for good reason. If you have an overclocked PC, you should be familiar enough with the BIOS to be able to reset the settings to their default values. Play it safe and throttle back.

10. Failing to have a recovery plan if the BIOS flash fails
When things go wrong it is a good idea to have a recovery plan. If your flash utility offers it, make a backup of your existing BIOS code. If this option is not available, download a copy of your current BIOS version or find a utility that will back up your current BIOS code. The original BIOS file should be on a bootable floppy with the flash utility and ready to install.
Prepare in advance for a floppy read failure by making bootable backup copies to have on hand. Mark your floppies with the BIOS version to know which are the new, and which are the original versions. It is also a good idea to copy the files to a Temp directory on the hard drive to verify that the files can be read or you can run CHKDSK to verify that there are no bad sectors on the floppy.

Research possible recovery options in advance and print them out. If you plan for a failure you will be less likely to panic if one occurs. If a failure does happen to you, do not turn off your computer. A failed flash means that the BIOS is likely corrupted and a reboot will fail. Keep the support number for your computer written down and available.

Plan for the worst case scenario; consider keeping a backup PC handy and ready to use.

The Final Word
If you have noticed some themes in this article then you are quite perceptive, patient reader:
Prepare, Prepare, Prepare!
Minimize the risks
Become educated and do your research
Double and triple check your work
I hope that these ten tips will aid you the next time you upgrade your BIOS. Happy flashing to you.

Five security tips from MediaWiki’s lead developer

Brion Vibber, the Wikimedia Foundation’s lead developer, is the guiding hand behind the ongoing improvement of MediaWiki. MediaWiki is one of the most widely-used Web applications in the world, and is the software basis for Wikipedia. On the Wikitech mailing list, he offered some insight into how he ensures secure development of the MediaWiki software.

Paraphrased slightly, the five key points are:

Don’t construct SQL by hand; use query-building abstractions to ensure proper encoding.
Don’t construct HTML output by hand; use wiki parser where suitable or XML-building abstractions to ensure proper encoding.
Don’t use $_GET, $_POST, $_REQUEST, and similar values directly; use abstractions that provide some basic data type validation.
Don’t use explicit include()s or require()s with configured paths; use class autoloader. When an explicit include is needed, always precede it with a constant check to avoid remote include vulnerabilities.
Make sure the fuzz testing tools get pulled out from time to time to look for HTML injection bugs (i.e. XSS vulnerabilities) and other such surprises.
All of this can really be boiled down to the following:
Use tools that are designed to produce consistent, reliable, secure code. When there’s a problem, fix the tool — not just the code it produced. This helps guard against human error, reduces duplication of effort, and ensures your developers always know what’s going on in the code so they won’t introduce bugs later trying to extend others’ work.
Test the results, regardless of how good a job you think you did. Subject it to significant stress, looking for where it breaks and misbehaves.

How do I… Uninstall Microsoft Internet Explorer 7?

The venerable Web browser continues to evolve. No longer just an application for displaying HTML, the Web browser now has to handle JavaScript, PHP, Java, Active X controls, loosely coupled Web services, plug-ins, multimedia, XML, RSS feeds and more. The Web browser has become an integral part of the total computer experience. All of those expectations make choosing a preferred browser more important than many ever thought it would or should be.

Microsoft Internet Explorer 7 (IE7) and Mozilla Firefox 2 are the latest Web browser contenders for your attention (apologies to fans of Opera and other Web browsers, but these are the two that garner the most attention). Many of us have tried both and made a decision about which is the browser of choice.
If you have chosen Firefox 2, then you may want to uninstall IE7. But this brings up two questions: Can you uninstall IE7 and if you can how do you do it? The answers are: Yes, you can and here’s how.
Uninstall IE7If your installation of IE7 was successful and uneventful, then uninstalling it is relatively simple process. The following steps will uninstall IE7 and restore IE 6.

Click Start, and then click Control Panel.
Click Add or Remove Programs.
Scroll down to Windows Internet Explorer 7, click it, and then click Change/Remove.
If for some reason Windows Internet Explorer 7 does not appear in the Add or Remove Programs, you should:

Open Windows Explorer
Click Tools Folder Options
Click the View tab
Make sure the radio button next to Show hidden files and folders is on
Click OK
Click Start, and then click Run
Type: %windir%\ie7\spuninst\spuninst.exe into the text box and click Enter
Specified user account
In some cases, you may get an error message when you try to uninstall IE7 that says you cannot uninstall from a specified user account. To get around this check you will have to edit the Windows Registry.

Warning: Editing the Windows Registry incorrectly can cause the Windows operating system to stop functioning completely. This is an advanced operation and you are encouraged to back up the Windows Registry before you attempt any editing of the file. You have been warned.
Bypass the user account check with this Windows Registry edit:
Click Start, click Run, type regedit, and then press ENTER.
Navigate to HKEY_CURRENT_USER\Software\Microsoft\Internet Explorer.
Right-click the Internet Explorer key, click New, and then click DWORD value.
Type InstalledByUser as the name, and then press ENTER to finish creating the new registry value.
Try to uninstall Internet Explorer 7 again.

20 things to consider when deciding on the structure of your IT organization.

At some point in most organizations, the decision is made to centralize and/or standardize Information Technology Services. This need for centralization and standardization arises from the complexity that comes with increasing size and the difficulty of managing an environment that has multiple moving parts—many in different directions.

The desire to take control of an environment that is considered in “disarray” is a strong one, and in many cases, it’s not a bad idea. However, having been on both sides of this debate, I have discovered some truisms about changing your IT structure that you might want to ponder before making a final decision:

1. Totally centralized, totally decentralized, or a hybrid IT environment can all work—it just takes good top management, a robust set of plans and an IT framework to pull it off. If you are going to insist on centralizing IT, you better be prepared to be flexible and provide superior customer service. One thing that decentralized environments tend to excel at is customer service—because they are closer to the customer and often are run by the customer. Therefore,
2. if you are going to take IT functions away from the other departments, be prepared to deliver service like they did.
3. Standardization does not have to mean centralization. It means that all parties agree to abide by a set of standards.
4. Forcing standards down people’s throats is like taxation without representation. You are inviting people to rebel. Form a governance committee where users have a voice.
5. Standards are not always black and white and they need to be reviewed frequently.
6. Technology changes rapidly and standards that don’t change with them will soon become hated mandates.
7. Piggybacking on the point above, try to build IT environments that are flexible and can accommodate new and changing technology.
8. Don’t use standards as a lame excuse for not being open to new ideas and innovation.
9. Setting a standard for a product such as a laptop and then giving users one configuration choice is not really a choice, nor is it customer friendly.
10. Listen to users’ needs and make sure your standardized choices can meet those needs; if not, your standards are worthless.
11. Just because a departmental IT operation is small does not mean it is insignificant. Often, they are working better and smarter than central IT and are providing better customer service.
12. Unless you are staffed for it and are extremely customer-focused, allowing users no control will lead to end user frustration.
13. IT support/helpdesk and the rest of your IT operation need to communicate often.
14. Communicate, communicate, communicate—about your plans, about your problems, about threats, current trends, etc. Don’t treat your end users like mushrooms; they will hate you for it and will not support you.
15. At budget time, you will hear nasty rumors floating around regarding your IT organization, whether they are true or not. Best to thwart those by abiding by the rule above.
16. Never forget that the IT organization is there to help the business work better, smarter, faster, cheaper…it is not enough just to keep the lights on.
17. An IT organization without standards can be a management nightmare and extremely wasteful. But an IT organization whose standards are too rigid, tends to be out of touch.
18. Communication will aid any type of structure you choose—and the structure you use will help determine the kinds of communication you need to employ.
19. Great technologists do not necessarily make the best managers.
20. No organizational structure can completely make up for bad management.
Having said all of that, my experience has been the happiest when running or being a part of a hybrid environment. Some IT services are best managed as a centralized service while others are left decentralized - although, I have seen the extreme in each work well or very poorly.
In most cases, as long as your users are getting good service and have a voice in the operations, most don’t give a hoot how IT is structured. However, if you stop delivering good service, you will start to feel pressure to move in the opposite direction, as users will clamor for change in order to get better service.

Understand and control the centralization cycle

One of the most consistent systems I’ve discovered moving from organization to organization is the "centralization cycle.” Companies move from highly centralized to highly decentralized IT organizational models, sometimes consciously, but often as a result of political forces. I’ve worked with CIOs struggling to keep their centralized models together, and with regional IT managers trying to break apart unresponsive monolithic organizations. No matter what part of the cycle you are on, it’s easy to get lost in the political, social, and organizational struggles and lose sight of the big picture.
From a participant's view, the cycle looks like a giant political and budgetary struggle. Egos and vested interests collide in a battle for political capital. Employees tremble as the great forces in their organizations confront one another, rewriting budgetary authority and lines of management. Or they cynically watch, well aware that this time next year everything will be rewritten again.
From an outsider's perspective, things are a bit less chaotic. In fact, despite the formal statements of various organizations there seems to be a natural cycle at work forcing the change. Different companies have different rhythms; one organization I worked with changed every five years, one every 10, and another every two—and each company's cycle was fairly regular. That last one had some of the most stressed employees I've ever encountered. But though the staff changed, sometimes radically, something held the company on a steady course.
Sources of the cycle
Since the cycles had predictable intervals, each company involved had to have some kind of consistent, guiding influences that set the context. Given the personal nature of the struggles, I strongly doubted that it tied to either a vision statement or other changeable business artifact.
When the revelation came to me, I was between jobs, so I took a bit of time to do research. What I discovered seemed obvious in retrospect.The most important factor in many companies’ centralization cycle was the business cycle of their market. It seemed to vary, however, whether a company centralized or decentralized during good times. Companies in multiple markets tended towards an average cycle, with different divisions centralizing and decentralizing at different rates.
The next most important factor was how credit for profit is allocated. IT (by its nature) rarely shares in the credit for business success but also correspondingly avoids the blame for failures. When there are few failures but many successes, credit accumulates in the extremities. When there are failures, that credit is expended, allowing the IT department to wrest control of budgets away from the outside factors. If, however, the IT department is organizationally the scapegoat for problems, it correspondingly gains in power when things go well.
Another guiding factor was how quickly the organization adopted changes. The easiest measurement for this came from the identification of new "change initiatives" and how deeply they affected the company. Companies whose management embraced change, but with very conservative structures, changed slowly. Less conservative cultures changed more quickly, whether the management wanted them to or not. In this case, IT centralization was just one of a host of changing systems, oscillating along with the rest of the organization.
The final factor I found, although it was present in only a few of my clients, was in the internal promotion systems. In those organizations where people could be promoted to central IT from the local organizations, the transition from centralized to localized IT seemed to carry much fewer ramifications. In these organizations the "transition" was largely a matter of budgetary chest beating; the actual decision making occurred through much more cooperative informal channels.
Turning this to our advantage
Other than pure sociological interest, what does this kind of analysis tell us? Does it suggest ways we can tune our organizations? Provide us with a unique tool for preserving the power of centralized IT despite whatever pressures might override us? Or are we doomed to forever writhe in the hands of a cycle we can’t control, taking credit and accepting blame for things that really have nothing to do with us?
The first thing it does is allow us to achieve some perspective on our situations. Although the losses and gains may feel distinctly personal, they are also part of a larger system of behavior within the organization. We can use this information to set aside our egos and address what our organization needs, not what we want.
The idea that centralization is a cycle also allows us to logically consider whether what we want meshes with the cycle of activity. Trying to push for centralization during a decentralization phase of the cycle may simply be burning political capital for no gain. If the forces at work are large enough (like a combination of corporate organization and market cycles) we can easily find ourselves ground underfoot. Rather than pushing for full centralization in such times, we need to concentrate our resources on protecting our "key features"—whatever it is that provides our particular IT organization with the highest ROI.
Finally, the idea that we are dealing with a cycle allows us to investigate the factors in that cycle in our own organizations. If we can work out the factors influencing the transition, we can more accurately focus our efforts. This allows us to step back from the limited arguments about a particular project or budget and focus on changing the influences themselves. In some cases (like a market cycle), we have no real control over the influence. In others (like promotion policy or organizational culture), we may have more influence than we think.
By formalizing and researching the idea of a cycle for IT centralization, we provide ourselves with a theoretical tool to help with our overall strategy for our organizations. We also create a context in which we can think about specific initiatives in terms of their applicability.

Counterpoint — five reasons to decentralize your IT department

I extolled the benefits of centralizing your IT department last week, and now I’m going to provide the counterpoint: the top five advantages you can gain by decentralizing your IT department.

5. IT is a smaller target for budget cutsDecentralizing primarily involves taking parts of the IT department - for example, software engineers for custom projects or help desk professionals - and assigning them directly to a department or business unit. This leaves a smaller group of professionals in the central services wing of the IT department. One of the advantages to this is that IT is not such a huge target when it comes time for budget cuts, and the IT workers in the business units are much more closely tied to revenue and so less likely to be viewed as expendable.
4. Less bureaucracy to manageWith a smaller group of IT professionals in central services, there are typically fewer groups, less hierarchy, and less political in-fighting. All of that adds up to less bureaucracy for IT leaders to manage, which means more time can be spent on developing effective IT strategies.
3. Projects get done fasterWhen you have developers, engineers, and architects tied directly to the business units, they tend to need fewer meetings and less communications in order to get on the same page with the stakeholders on the business side. That’s because they work more closely with the business side on a daily basis and typically report up through the business leaders of the division. This type of streamlined communication can lead to projects that get done much faster and more efficiently.
2. Achieve better IT/business alignmentWhen business unit leaders have IT professionals and IT teams who are part of their department, they tend to demonize IT far less. And when IT pros are part of a business unit or department (in a large organization), they often do a much better job of learning the business and finding the technologies that can enhance it.
1. Increase responsiveness to users and customersThe number one value proposition is speed. Requests don’t have to go into a central queue and then wait for the appropriate and/or available technologist to handle the request. Business leaders can work directly with the technologists in their business unit to solve problems, make changes to a project, tweak plans, make purchases, etc. This often results in much higher internal satisfaction with IT. For some businesses, this can also translate directly into higher customer satisfaction due to the perception of increased responsiveness.

Assemble the perfect system administrator’s toolkit

The Job

You’ve been in IT for the past 15 years. The IT manager of a big firm, you manage a team of 10 IT staff that serves the in-house needs of more than 500 employees, and you know you do a great job at it.

After another day hard at work planning the new PBX migration project, your mobile phone rings. It’s your CEO on the line. There’s a problem with his home PC, which refuses to boot. He needs to retrieve a critical document from it for a keynote presentation the next day. He lives down the road from you.

So what do you do now?

A) Tell him you’re an IT manager, and you don’t do PC servicing anymore.
B) Tell him that you’re at as much of a loss as he is.
C) Tell him not to worry and show up at his house an hour later with the team leader.
D) Tell him not to worry and that you’re be right over in 5 minutes yourself.

If your answer is option A, B, and maybe even option C, then I suggest you head down to Toni’s excellent Career blog for some advice on getting a new job.

If your answer is D, then perhaps this Right Tool post is for you.

Sometimes, there’s no other way but to rollup your sleeve and get your hands dirty. Nothing beats being prepared, however. To help you along, I have put together a list of items that you can assemble into your very own system administrator survival toolkit.

The list is presented in no particular order.

As you might have noticed by now, today’s Right Tool post is somewhat different. Instead of the tool, I’m presenting you with a list of 20 tools that you might want to consider throwing into your own system administrator’s toolkit. (Come on, you know real IT pros builds their own kits.)

Cable tester
Portable labeler
Bluetooth mouse
Anti-static strap
Releasable cable ties
Portable hard disk drive
Encrypted USB flash drive
Crimping tools
Hard disk wiper
Hard disk to USB adapter
USB hub
RJ11 cable
Patch cables
Multimeter
Screwdrivers
Multi-plug adapter
Original disc media
Serial to USB adapter
RJ-45 extender
Wireless modem

The Right Tool for the Job?

How well does this lineup represent your needs? Please let us know what you would put in your toolkit. And yes, it should be something you can lug around relatively easily, so you can leave out that 42-U server rack and SAN array.

Ensure basic Web site security with this checklist

While I normally advocate a principles-based approach to maintaining system security – and deplore the typical “best practices” checklist approach – that doesn’t mean that security checklists are without value. Employing a security procedures checklist is only the first step toward securing a resource, a means of aiding your memory before you apply your critical thinking skills and imagination to the problem of improving on the checklist in each individual case. Sometimes, a checklist can be useful in affecting workplace security policies as well.

A number of far-too-common security failures on Web sites and Web servers are addressed here. Because of the frequency of these poor security practices, it strikes me as important to gather good practices that address these problems in one place and to make them publicly available to Web server administrators, Web developers, and Webmasters. For those of you who haven’t considered all these factors in managing your Web resources, I recommend dealing with what you have left unconsidered as quickly as possible.

For those whose management has proved resistant to suggestions for improving security in these areas, or who simply need help in composing a message to management that will make your point clearly so that it isn’t misunderstood, I hope you find the following checklist of Web security practices helpful.

Login pages should be encrypted: The number of times I have seen Web sites that only use SSL (with https: URL schemes) after user authentication is accomplished is really dismaying. Encrypting the session after login may be useful — like locking the barn door so the horses don’t get out — but failing to encrypt logins is a bit like leaving the key in the lock when you’re done locking the barn door. Even if your login form POSTs to an encrypted resource, in many cases this can be circumvented by a malicious security cracker who crafts his own login form to access the same resource and give him access to sensitive data.

Data validation should be done server-side: Many Web forms include some JavaScript data validation. If this validation includes anything meant to provide improved security, that validation means almost nothing. A malicious security cracker can craft a form of his own that accesses the resource at the other end of the Web page’s form action that doesn’t include any validation at all. Worse yet, many cases of JavaScript form validation can be circumvented simply by deactivating JavaScript in the browser or using a Web browser that doesn’t support JavaScript at all. In some cases, I’ve even seen login pages where the password validation is done client-side — which either exposes the passwords to the end user via the ability to view page source or, at best, allows the end user to alter the form so that it always reports successful validation. Don’t let your Web site security be a victim of client-side data validation. Server-side validation does not fall prey to the shortcomings of client-side validation because a malicious security cracker must already have gained access to the server to be able to compromise it.
Manage your Web site via encrypted connections: Using unencrypted connections (or even connections using only weak encryption), such as unencrypted FTP or HTTP for Web site or Web server management, opens you up to man-in-the-middle attacks and login/password sniffing. Always use encrypted protocols such as SSH to access secure resources, using verifiably secure tools such as OpenSSH. Once someone has intercepted your login and password information, that person can do anything you could have done.

Use strong, cross-platform compatible encryption: Believe it or not, SSL is not the top-of-the-line technology for Web site encryption any longer. Look into TLS, which stands for Transport Layer Security — the successor to Secure Socket Layer encryption. Make sure any encryption solution you choose doesn’t unnecessarily limit your user base, the way proprietary platform-specific technologies might, as this can lead to resistance to use of secure encryption for Web site access. The same principles also apply to back-end management, where cross-platform-compatible strong encryption such as SSH is usually preferable to platform-specific, weaker encryption tools such as Windows Remote Desktop.

Connect from a secured network: Avoid connecting from networks with unknown or uncertain security characteristics or from those with known poor security such as open wireless access points in coffee shops. This is especially important whenever you must log in to the server or Web site for administrative purposes or otherwise access secure resources. If you must access the Web site or Web server when connected to an unsecured network, use a secure proxy so that your connection to the secure resource comes from a proxy on a secured network. In previous articles, I have addressed how to set up a quick and easy secure proxy using either an OpenSSH secure proxy or a PuTTY secure proxy.

Don’t share login credentials: Shared login credentials can cause a number of problems for security. This applies not only to you, the Webmaster or Web server administrator, but to people with login credentials for the Web site as well — clients should not share login credentials either. The more login credentials are shared, the more they tend to get shared openly, even with people who shouldn’t have access to the system. The more they are shared, the more difficult it is to establish an audit trail to help track down the source of a problem. The more they are shared, the greater the number of people affected when logins need to be changed due to a security breach or threat.

Prefer key-based authentication over password authentication: Password authentication is more easily cracked than cryptographic key-based authentication. The purpose of a password is to make it easier to remember the login credentials needed to access a secure resource — but if you use key-based authentication and only copy the key to predefined, authorized systems (or better yet, to separate media kept apart from the authorized system until it’s needed), you will use a stronger authentication credential that’s more difficult to crack.

Maintain a secure workstation: If you connect to a secure resource from a client system that you can’t guarantee with complete confidence is secure, you cannot guarantee someone isn’t “listening in” on everything you’re doing. Keyloggers, compromised network encryption clients, and other tricks of the malicious security cracker’s trade can all allow someone unauthorized access to sensitive data regardless of all the secured networks, encrypted communications, and other networking protections you employ. Integrity auditing may be the only way to be sure, with any certainty, that your workstation has not been compromised.

Use redundancy to protect the Web site: Backups and server failover can help maintain maximum uptime. While failover systems can reduce outages due to server crashes (perhaps because of DDoS attacks) and server shutdowns (perhaps because the server was hijacked by a malicious security cracker) to mere hiccups in service, that isn’t the only value to redundancy. The duplicate servers used in failover plans also maintain an up-to-date duplication of server configuration so you don’t have to rebuild your server from scratch in case of disaster. Backups ensure that client data isn’t lost — and that you won’t hesitate to wipe out sensitive data on a compromised system if you fear that data may fall into the wrong hands. Of course, failover and backup solutions must be secured as well, and they should be tested regularly to ensure that if and when they are needed, they won’t let you down.

5 of the best desktop operating systems you never used

Bill Gates’ original dream when he created Microsoft was to have “a computer on every desk and in every home, all running Microsoft software.” Clearly, he accomplished that goal. Depending on whose statistics you want to believe, Windows has a market share in the high 80% - low 90% range. So, unless you run Linux or prefer Mac OS X, chances are you’re a Windows user.

When it comes to desktop operating systems, your choices are really pretty narrow. You either run Windows, or you do some Unix-like OS. There are the 12,000 different Linux distributions. There’s always FreeBSD if you prefer your Unix without a Finnish flavor. You could go the vendor route and run AIX or HP-UX. Sun has Solaris, and as much as you might want to, you can’t forget SCO. And of course, there’s always Mac OS X. Although it may sound like variety when it comes down to it, it’s still Windows vs. Unix.

There are other options, or at least there USED to be. Here are a list of five of the best operating systems that you probably never used

OS/2

No discussion can be had of Microsoft alternatives without mentioning OS/2. Until Microsoft shipped Windows 2000 Professional, OS/2 4.0 was probably my desktop OS of choice. For the purposes of this section, I’m referring to OS/2 2.0 and later, not IBM and Microsoft’s ill fated OS/2 1.x series.

IBM billed OS/2 as being a “Better DOS than DOS” and a “Better Windows than Windows”. Anyone who ever ran OS/2 knows that IBM largely succeeded. From a technical perspective, OS/2 was much more solid than DOS, Windows 3.x or even Windows 9x.

OS/2 had many innovations that we come to view as standard equipment in an OS today. OS/2 was the first major 32-bit operating system. It was completely multi-threaded. Its HPFS file system resisted fragmentation and could natively support large filenames. OS/2 was the first major OS to integrate a Web browser into the operating system. It was also the first operating system to offer voice-control.

There are many reasons why OS/2 failed. Windows 95 came out and even though OS/2 was more stable, its inability to run Win32 API-based programs doomed it. It ran DOS and Windows 3.1 programs so well, ISVs never had an incentive to create native OS/2 programs. Microsoft’s licensing scheme with OEMs discouraged hardware vendors, including IBM itself, from bundling OS/2. It didn’t help that IBM couldn’t market OS/2 to save its life.

Even though the last version of OS/2 shipped in 1996, IBM continued to support OS/2 until December 31, 2006. Many OS/2 supporters have tried to get IBM to release OS/2’s source code for open source development, but IBM refuses. Supposedly this is due to some of the Microsoft code that still exists in OS/2 that IBM has exclusive rights to. At the same time however, IBM licensed OS/2 to Serenity Systems who continue to support, upgrade, and extend OS/2 in their own product called eComStation.

One final bit of OS/2 trivia. Microsoft co-developed OS/2 1.x with IBM. When IBM and Microsoft got ‘divorced’ in the late 80’s, Microsoft took its part of the code for what was to become OS/2 3.0 on the IBM/Microsoft product roadmap and created Windows NT 3.1, which today lives on as Windows Vista and Windows Server 2008.

NeXT

The NeXTSTEP OS is one that even I never used. It came up in conversation with Jason Hiner who had used it while a student at IU. NeXTSTEP has a important place in history that can’t be overlooked.

Today, Apple is Steve Jobs and Steve Jobs is Apple. You can’t really think of one without the other. It wasn’t always that way though. In 1985, in grand Greek Tragedy form, Steve Jobs was forced out of Apple by John Sculley, the executive that Jobs himself brought in from Pepsi to save Apple from financial disaster. When Jobs left Apple, he went on to form the NeXT Computer Company.

NeXT’s initial goal was to create powerful workstations for education and business. The NeXT workstation’s major innovation at the time was its 256Mb WORM drive that it used for removable storage rather than a traditional floppy drive. The NeXT came with the entire works of Shakespeare on a single CD-ROM which was one of the ‘cool factors’ about the box when it was introduced. The NeXT workstation also continued Job’s history of thinking different when it came to design, because the NeXT workstation was a simple Borg-like cube.

At the heart of the NeXT workstation was the NeXTSTEP OS. This OS was based on the Mach Unix kernel. It was originally developed for NeXT’s PowerPC CPU, but Jobs also created a version of it that ran on the Intel 486 CPU called NeXTSTEP 486.

NeXTSTEP is significant because when Jobs finally retook his rightful place as the head of Apple in 1996, he did so by arranging Apple to buy NeXT. In doing so, the NeXTSTEP OS came along as part of the package and ultimately became Mac OS X.

BeOS

The BeOS was an interesting, powerful, and probably the most jinxed OS that was ever created. It debuted in 1991 and some of its innovations such as a 64-bit journaling file system in BFS, still haven’t found their way into current operating systems.

BeOS came very close to becoming the operating system that we use on the Mac platform today. BeOS started out as an proprietary operating system for the BeBox which was a workstation that ran PowerPC CPUs. When the BeBox failed to go anywhere in the marketplace, Be tried to sell the company to Apple to replace MacOS, which by 1996 was starting to show its age in the face of Windows 95. Apple nearly did it, but decided to buy NeXT and bring back Steve Jobs as mentioned above.

Be then continued its desperate bid to find a home and purpose for the OS. It started by trying to peddle BeOS to the makers of Mac-clones who were cut off from Apple when Steve Jobs returned. That didn’t work. (Yes, in the mid-90’s you could actually buy clones of the Mac. Apple licensed the OS and the Mac ROMs to OEMs. One of Steve’s first actions upon getting back in at Apple was to squash the Mac-clone market.)

Be then tried to port the BeOS to the Intel platform and get some traction against Windows. That didn’t work either. Be next tried to create a version of BeOS for Internet appliances. When that failed as well, Be sold out to PalmSource who wanted to include BeOS technology in their next OS. Guess how that turned out? PalmSource subsequently crashed and burned, selling the rights to BeOS to Access Co, a maker of mobile devices.

I never used BeOS other than to install it and kick it around a little to see how it worked. I have a copy running in Virtual PC on my test machine, but due to limited hardware support of the
virtual machine environment, BeOS won’t come up in color and won’t talk to the network card.

DESQview

The last two I want to mention aren’t really operating systems per se, but rather operating environments. But, if Windows 9x can qualify as an operating system, so can these. The first is DESQview.

DESQview was a program that ran on top of DOS that allowed you to multitask DOS programs. As a matter of fact, until Microsoft introduced Windows 95, with the exception of OS/2 the best way to run multiple character based DOS programs was through the use of DESQview.

DESQview didn’t multithread programs, because such technology didn’t exist at the time. Rather, through the use of QEMM, DESQview used expanded memory on your computer if it had an 80386 CPU to run DOS programs simultaneously. If you only had a 286, you couldn’t use expanded memory, but DESQview would still task-switch programs through extended memory. It wasn’t as efficient as running on a 386, but it still got the job done.

Of course, Windows 3.x could multitask DOS programs. Compared to DESQview however, Windows 3.0 it had so much overhead, that it was slower and often wouldn’t leave enough lower 640Kb memory behind for DOS programs to run. If you had enough extended memory in your computer, QEMM, DESQview’s memory manager, could actually free almost the entire lower 640Kb memory area for program use.

DESQview was one of the first victims in the PC tradition of Good Marketing Beats Better Technology. Even though DESQview multitasked DOS programs better than Windows, Microsoft ultimately won the day. Quarterdeck, the maker of DESQview, tried creating a GUI-version of it called DESQview/X, but this never went anywhere. Ultimately, Quarterdeck sold out to Symantec. Symantec still owns the rights to DESQview, but doesn’t market it.

I used DESQview extensively in college. Even on a 80286 without QEMM, you could still multitask programs very well using DESQview. Unfortunately, I couldn’t find my copy of DESQview to grab a screenshot for this blog post. I’ll see if I can find it and get one.

GEOS / GeoWorks

In early 90’s if you wanted to get on the GUI bandwagon and didn’t want to use a Mac, your only choice was really Windows 3.0. But to make Windows 3.0 work properly, you really needed to have 386 with EGA or VGA graphics. If you had an ‘older’ computer, you were pretty much out of luck. That’s where PC/GEOS came in.

GEOS was a GUI that ran on Atari and Commodore 64 computers. In 1990, GeoWorks created a version of GEOS called PC/GEOS which would support a GUI and limited multitasking on 286 and even some XT machines (8088-based PC clones). GEOS was lightweight, fast, and easy to use but never got traction from software developers because it was hard to program for and the developer kit was expensive.

GEOS included Ensemble which was its own office suite program consisting of a word processor, spreadsheet, dialer, database, and calendar. This was in an era where Microsoft Office didn’t exist and if you wanted these applications you had to buy them separately. GEOS was also used by AOL for the DOS version of their connection software.

Once Windows conquered the desktop and hardware caught up to Windows’ appetite, GEOS fell out of favor. GeoWorks ultimately sold out to NewDeal Inc, which tried to market the OS as a Windows alternative to those with older machines and for schools. When this didn’t work, NewDeal ultimately failed and sold its business to BreadBox who continue to make, support and update a version of GEOS called BreadBox Ensemble.

My copy of GEOS is long gone, but I ran it for a while on my Tandy 1000. It did the job, but I needed more power than what was in the supported applications and it didn’t run DOS programs very well.

All that and more

So there you have 5 of the best operating systems you probably never used. Each introduced innovations that we still use today, as well as some we’re still trying to catch up with even though the programs debuted in the 20th century. In each case, they were overlooked, underrated, and ultimately crushed by the Microsoft steamroller.

There are plenty of OSes I left off the list: CP/M, TRS-DOS, LDOS, DR-DOS and others (which I encourage you to remind me of.) We’ll try to cover those in the future as well.

The worst server room decisions ever made by management

An annual electrical maintenance resulted in a total shutdown of power for about eight hours on a Sunday. Unknown to IT, one of the departments actually had a staffer coming back every Sunday in order to do an online electronic filing of certain shipping documents.

Never mind that nobody in that department saw the notices of the impending power shutdown on every elevator door over the entire week, or noticed the company-wide e-mail blast. The lone staffer arrived as usual that fateful afternoon to a darkened office. Obviously, he failed to do the requisite filing, resulting in a compound fine being imposed on the company.

The company’s General Manager was upset and asked why the uninterrupted power supply (UPS) investment still resulted in non-functional servers. When it was pointed out that the power in the current UPS could only last the one dozen servers for between 15 to 20 minutes, the order was given (over my objections) to purchase sufficient UPS capacity to last through a “full day” of power outages.

Preliminary estimates with engineers from APC indicated that we needed two 42-U racks packed with UPS and extender batteries to be able to meet the desired runtime. The cost? $20,000.

The idea was given up only when I realized that a fully running server room without a powered air-con or ventilation is not a very good idea. To spare myself an urgent visit to Toni’s View from the Cubicle blog for tips on getting a new job, I doubled the estimate to accommodate the air-conditioning - at which point we also ran out of space in the server room. Thankfully, the directive was scrapped after that.

If you have to ask: yes, a diesel generator was totally out of the question since the server room was located squat in the middle of an office complex.

Refusal to buy server racks (Penny wise, pound foolish)

Unless you’ve been working in MNCs all your life, you’ve probably encountered this one before: Management refusing to purchase proper server racks.

Now, a certain reluctance to splurge a few multiples of grand on a high-end kit is understandable. But the situation becomes a little intolerable when we’re talking about just a couple of simple bare-bones 42-U racks costing less than a grand each - to house no less than a dozen and a half servers currently scattered all over.

Have you encountered a situation like this before?

In my case, I finally got my way in this scenario. But I wanted to hear from more of you who serve at the “front line,” however. How would you justify the value of proper server racking?

Splurging on the wrong things (Reacting from fear)

Just before I joined this particular company, one of the database servers suffered a serious hard disk error, resulting in a corrupted database. The near line backup was no good because its mediocre hard disk had long ran out of sufficient capacity for even one full backup.

We recovered the data for the most part. Due to the resulting anxiety, management wanted to replace two of the database servers with brand spanking new ones.

I had just joined the company, and the exact instruction given by my boss was: “Just go for the best. I’ll pay.” Now, you must understand that these database servers, though critical, were used by no more than five users each; there are so many cheaper methods to prevent a recurrence of the problem. I confess that I didn’t follow the instructions in the end. I quietly told the vendor to just give me something mid-end, and we ended up spending about $16,000 on two HP servers.

Still, the money spent could have been better used elsewhere- like replacing a couple of production servers that were more than eight years old and for which there is no functional equivalent in terms of hardware.

Uninstalling and disabling drivers in Windows Server 2003’s Device Manager

Last week, we went over rolling back drivers in order to undo updates. Still, occasionally you may need to update or uninstall a device driver that is no longer necessary or is not performing as expected within Windows Server 2003. This tip will go through the process of uninstalling and disabling device drivers.

As you may recall, updating a device driver requires that you download a driver before starting. It is recommended that you also view the details of both the existing driver (using the Driver Details button) and the newly downloaded driver (by unzipping the driver file, locating either the .dll or .sys file, and then right-clicking one of these files and choosing Properties). You can then proceed with the Update wizard that appears on the screen.

Uninstall Driver removes the current device driver and its device from the Windows Server 2003 system altogether. This can be useful if you are troubleshooting a device problem, allowing you to uninstall and reinstall the driver.

To uninstall a device driver, complete the following steps:

1. Open the Computer Management Console by right-clicking My Computer on the Start menu and selecting Manage.
2. Select Device Manager in the left pane of the console. The Device Manager will then display a list of installed devices in the right pane of the console.
3. Expand the category of the device you wish to uninstall.
4. Right-click the device and select Properties.
5. Select the Driver tab on the device’s Properties dialog box.
6. Click the Uninstall Driver button.
7. A new dialog box will pop up asking you to confirm the uninstall. Click OK to proceed.
8. Shut down the system to remove the device.

When uninstalling a device driver for plug-and-play devices, the device must be connected to the system. Windows Server 2003 manages most of these drivers dynamically.

In some cases, you may wish to determine how your system will function without a device — perhaps one that you no longer use. You can use the steps above to remove the driver for the device and test the system without the device.

Rather than removing a device to test the system operation, you can also disable it in the Device Manager to prevent the system from trying to start the device. Follow these steps:

1. In Device Manager, right-click the device you wish to disable.
2. Choose Disable from the Context menu.

You can then test the system with the hardware turned off to see how it will perform. If it meets your organization’s needs, you can then remove the device when it is convenient to turn off the Windows Server 2003 system.

Configure Windows Explorer to display Windows XP disk drives

When you double-click the My Computer icon in Windows XP, you see a list of all the drives on your hard disk. However, when you launch Windows Explorer, it displays the contents of My Documents in the right panel. If you like the way that the My Computer view displays all the disk drives when you first launch it, but prefer the Windows Explorer view, here’s how you can get the best of both views.

1.Right-click on the desktop.
2.Select New Shortcut.
3.Type C:\Windows\Explorer.exe /n, /e, /select, C:\ in the text box, then click Next.
4.Type My Explorer in the text box and click Finish.

Using the /Select switch with C:\ as the object causes Windows Explorer open a My Computer view of your system. Now, when you select your new shortcut, your window will look more like the My Computer view.

Can a CEO's terrible people skills affect company success?

They were all C-level executives at high-profile companies who lost their jobs due to interpersonal incompetence (aka “no people skills”).
(Julie Roehm was fired from Wal-Mart; Robert Nardelli was forced out of Home Depot; Steve Heyer was let go from Coca-Cola; and Harry Stonecipher lost his job at Boeing.)
In his Forbes blog last week, Dale Buss quotes Bob Eichinger, CEO of Lominger International, as saying such people are “promoted into their jobs for their business smarts, and they fail because of weaknesses in their people smarts.”
Well, no kidding.
As I think we’ve all learned from Donald Trump, many highly successful people rise to the top because they have some kind of genius for business. And many stay at the top in spite of a pronounced lack of interpersonal skills. As long as they’re making money, the stakeholders can overlook the trickle-down problems that affect the worker bees.
Until, that is, those trickle-down problems become so severe that they start to affect profits.
I shudder to think how bad things have to get for shareholders to tie in an executive’s interpersonal skills with a shrinking profit margin, but I’m encouraged by the fact that sometimes the connection is indeed recognized.